
Using Branch Block
The Branch is a workflow block for defining multiple alternative paths in one place. Instead of chaining many separate Condition blocks (hard to read and maintain), you add branches inside a single block and set rules for each. The system evaluates branches top → bottom and sends the contact down the first branch whose rules are met. This keeps complex logic clear, compact, and easy to maintain.
Why use it
- More order: Replace long Condition chains with one tidy decision point.
- Faster reviews: All rules are visible side-by-side — no more opening blocks and memorizing details.
- Easy edits: Label, duplicate, collapse, and rename branches without rebuilding logic.
Setting Up Branch Rules
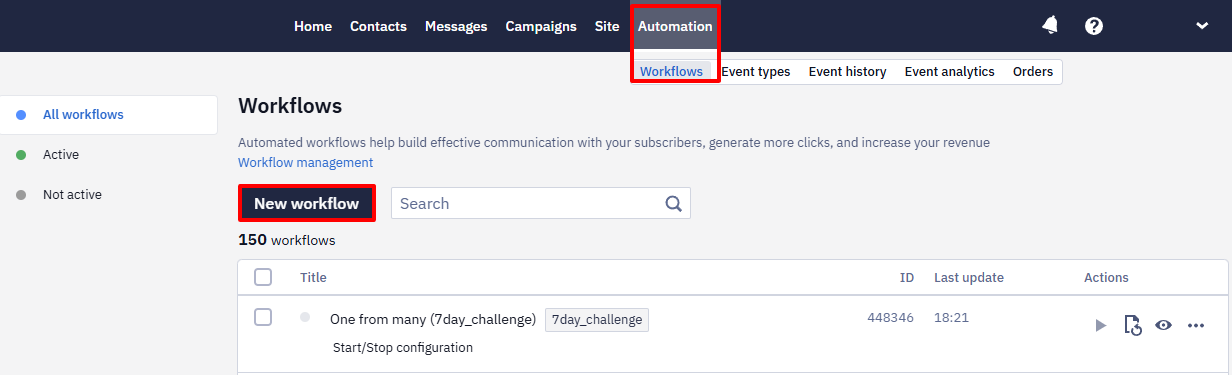
- Open or create a workflow in the Automation → Workflows section.
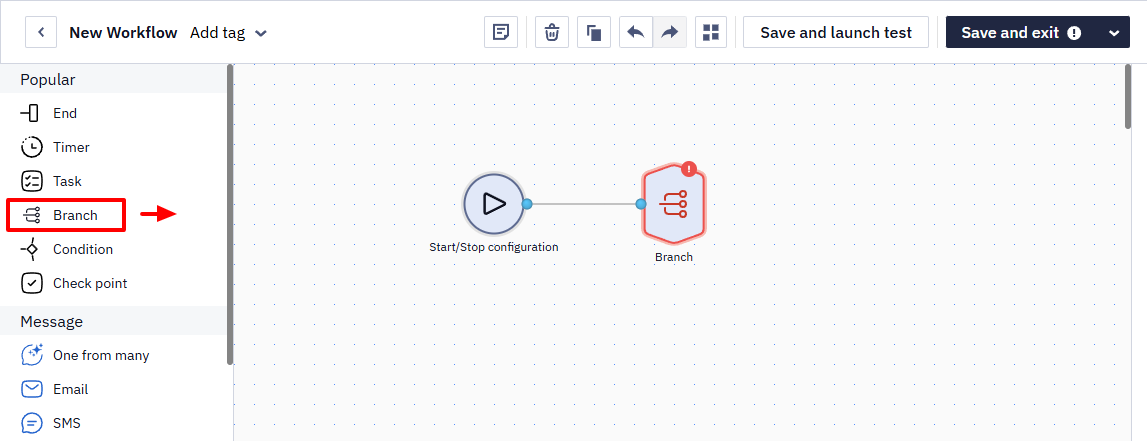
- Drag the Branch block from the left sidebar into the workflow.
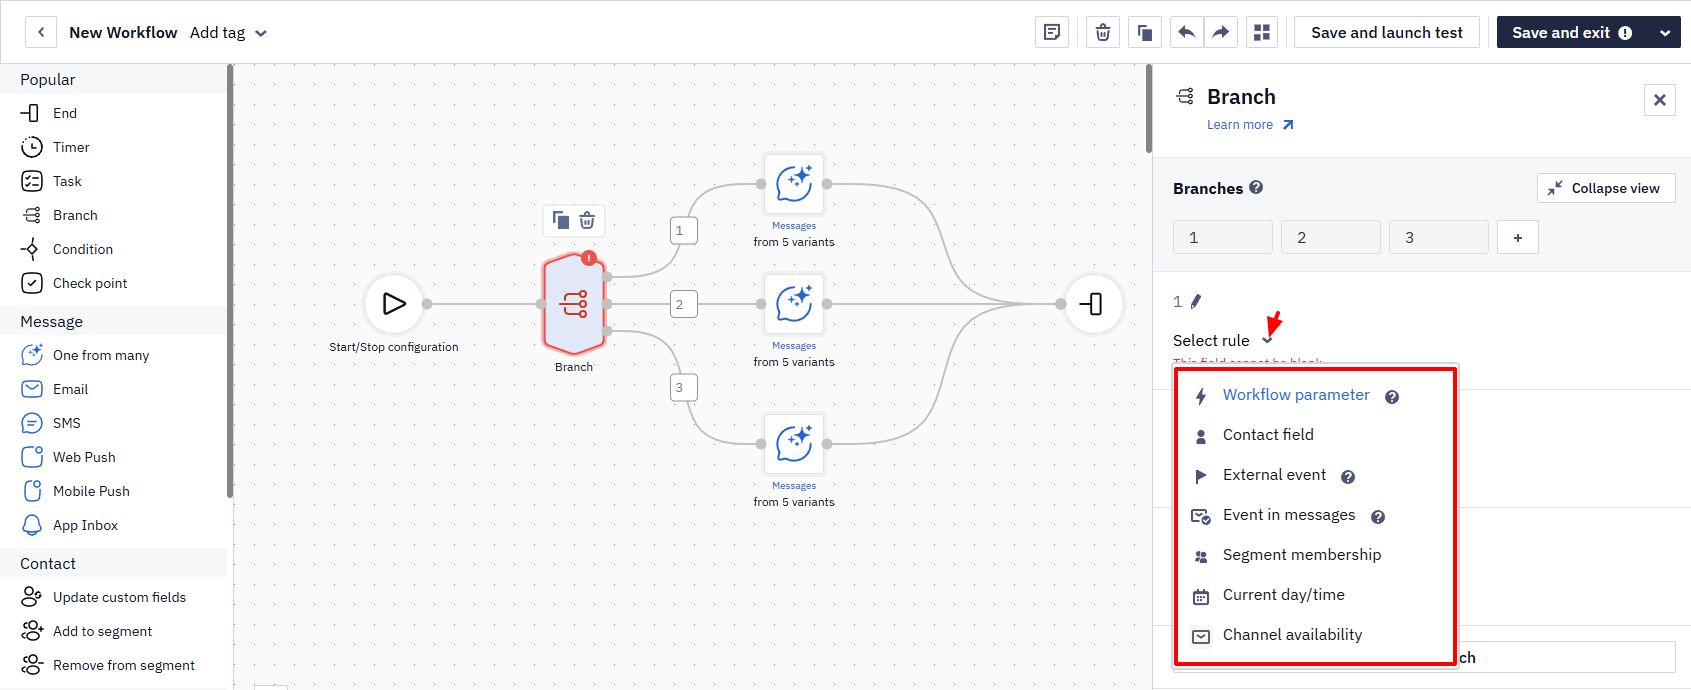
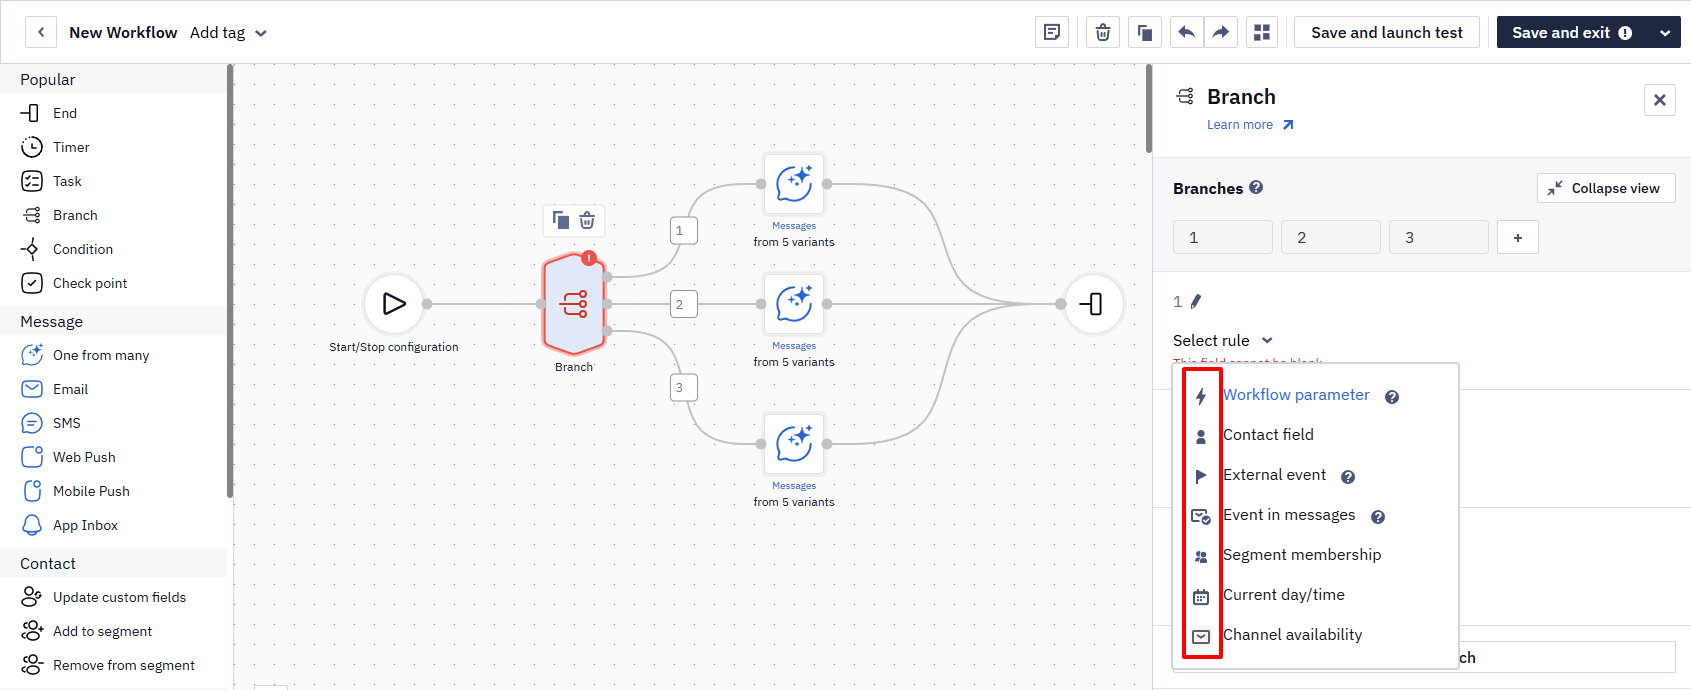
- Configure branches. You can base its rules on any of the following:
- Workflow parameter (context of the event that triggered the workflow)
- Contact field
- External event — tracked behavioral events (e.g., app actions) and their attributes
- Event in messages (engagement with earlier Message blocks)
- Segment membership — checking the input to the audience lists you’ve already built
- Current day/time — check date, days of the week, time
- Channel availability — Email, SMS, Viber, Web Push, Mobile Push, App Inbox, Telegram
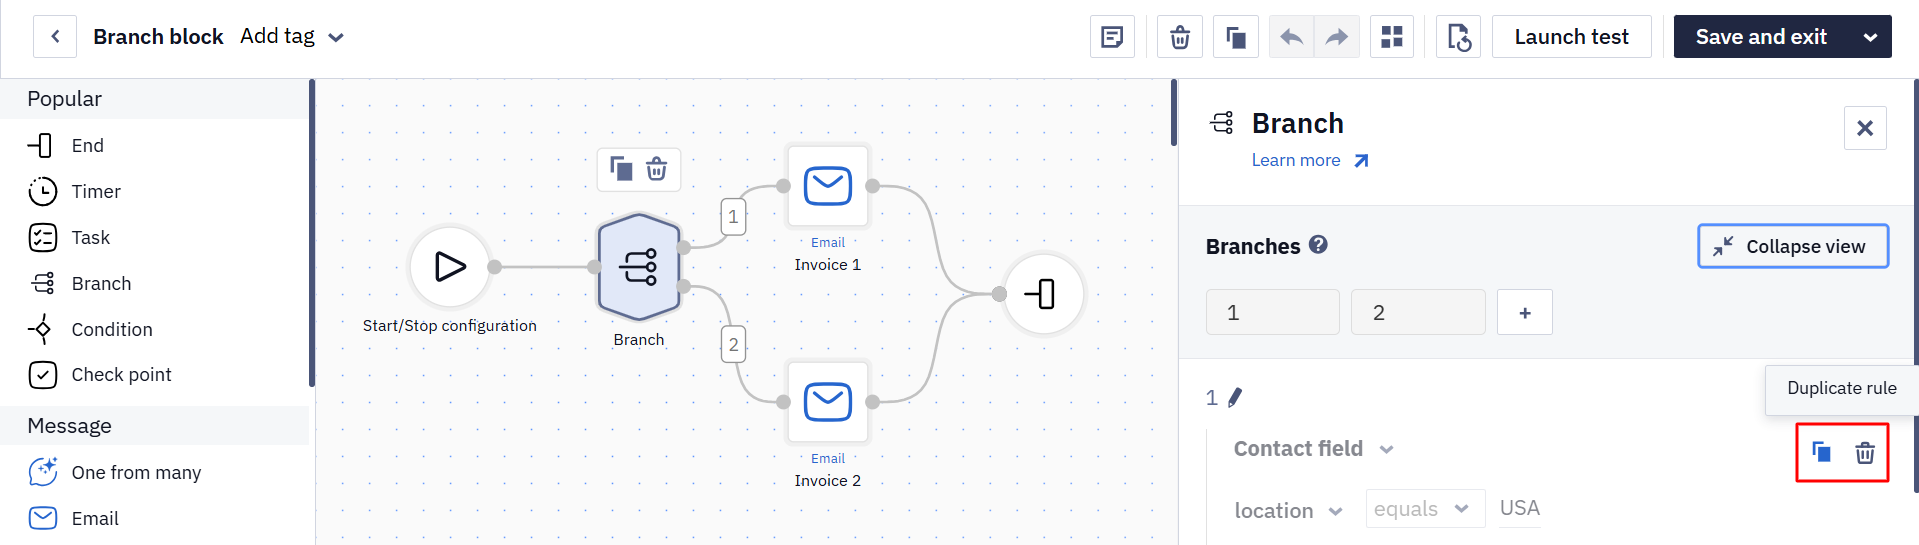
Each individual rule has Duplicate rule and Delete rule buttons. Use them to copy a rule with all its settings or delete only the selected rule.
The UI shows icons to recognize rule types quickly.
NoteThe Branch block supports
dateToolexpressions in its conditions. For example, you can compare the result of$!dateTool.diff($!start_date, $!end_date, 'DAYS'), and the contact will be routed to the matching branch or to Fallback if no rule matches.
Workflow Parameter
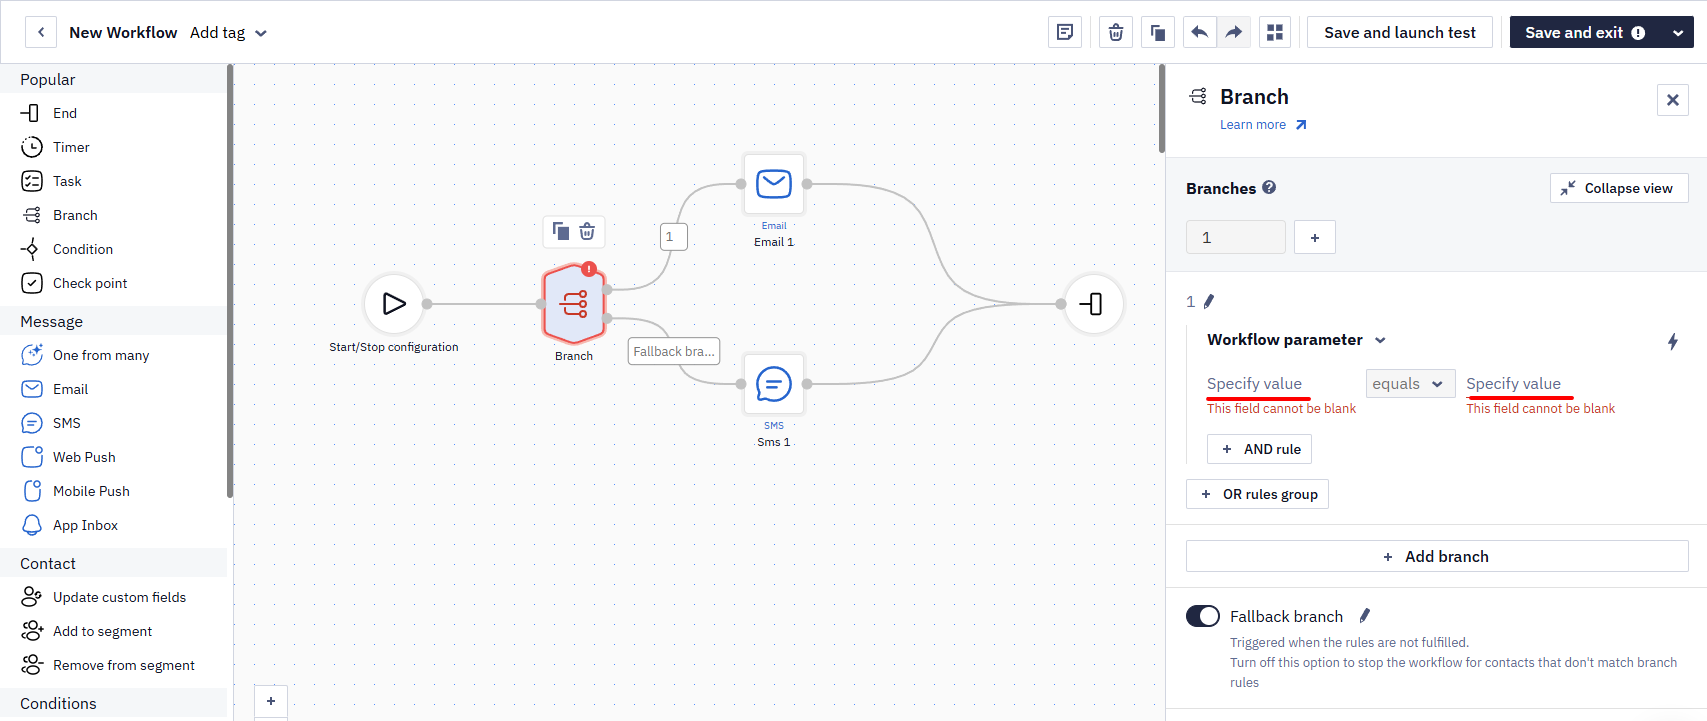
- Choose the workflow's parameter (e.g.,
utmCampaign,orderValueBucket,shippingMethod). - Pick an operator (e.g.,
Equals,Contains,Between,Is set). - Enter the value.
For a parameter of the Date or Date with time type, the operator list also offers is today, is tomorrow, during and was — one branch can take the contacts whose order is due for delivery today or tomorrow, and another the rest. The same operators are available in a Contact field rule for date fields.
Usage example
- Branch 1:
orderValueBucket Equals High→ Thank-you + loyalty fast-track and premium support info trackers) - Branch 2:
orderValueBucket Equals Medium→ Cross-sell essentials (care kit, add-ons) - Branch 3:
orderValueBucket Equals Low→ AOV booster bundle (free shipping threshold tip) - Fallback:
Didn’t match 1–3→ Standard post-purchase series
NoteThe Fallback branch is evaluated after all other branches. It captures contacts that don’t match any prior rules. If you disable Fallback, contacts that don’t match any branch will stop at this point in the workflow.
Contact Field
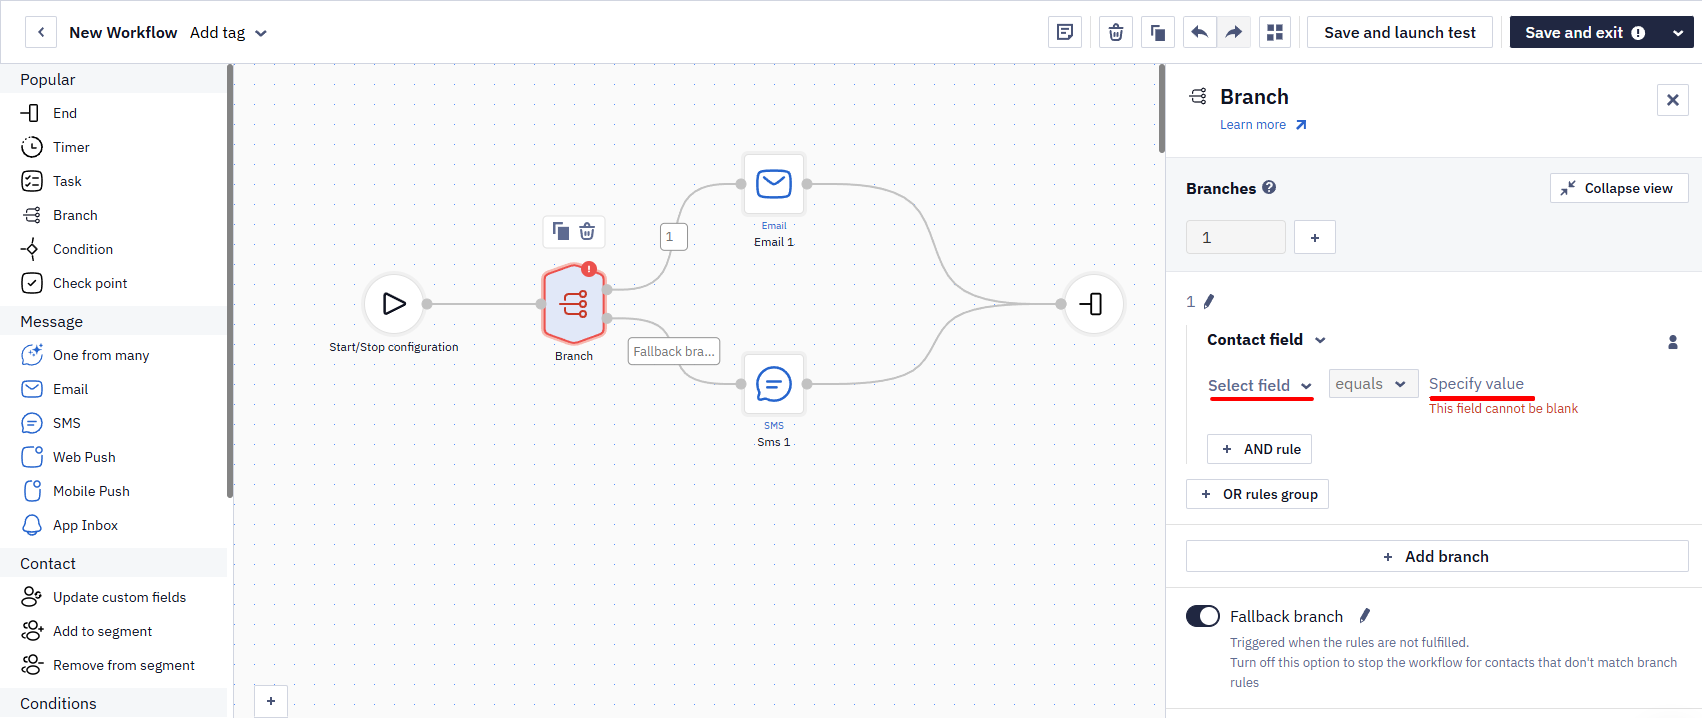
- Select a contact field (e.g.,
favoriteCategory,sizePreference,preferredBrand). - Choose an operator appropriate for the field type (e.g.,
Equals,Does not equal,Is set,Is empty). - Specify the value.
Usage example
- Branch 1:
favoriteCategory Equals Footwear→ Sneaker drops + size-based recommendations - Branch 2:
favoriteCategory Equals Apparel→ Outfit builder + new arrivals in preferred sizes - Branch 3:
favoriteCategory Equals Home→ Room-by-room bundles + seasonal decor guide - Fallback:
Didn’t match 1–3→ Best-sellers + “pick your interests” prompt
Combine with another field using the AND rule (e.g., favoriteCategory Equals Footwear AND sizePreference Equals 42) for higher relevance.
NoteAn event starts a workflow regardless of whether the contact is active or deleted, but the system looks up the
contactIdfor the workflow context only among active contacts. For a deleted contact the workflow starts without acontactId, so their contact card isn't loaded — a Contact Field rule checking that contact evaluates as not matching (false), even if the field has a value once the card loads; Segment membership checks don't pass either. If your workflow can run for restored contacts, pass the needed data as event parameters and branch on a Workflow parameter or External event rule instead.The event itself doesn't restore a deleted contact — the contact is restored when a message is sent to them. If the event contains an email address, a Message block with
${emailAddress}as the recipient sends the message to the address from the event and restores the contact. For transactional workflows that must also work for deleted contacts, pass the email as an event parameter and use it in the Message block. To get thecontactIdin the workflow after the contact is restored, add a Timer and a Get contact block after the message.
External Event
- Specify the event type with segmentation enabled (e.g.,
ProductViewed,CartUpdated,OrderPlaced). - Select the time window.
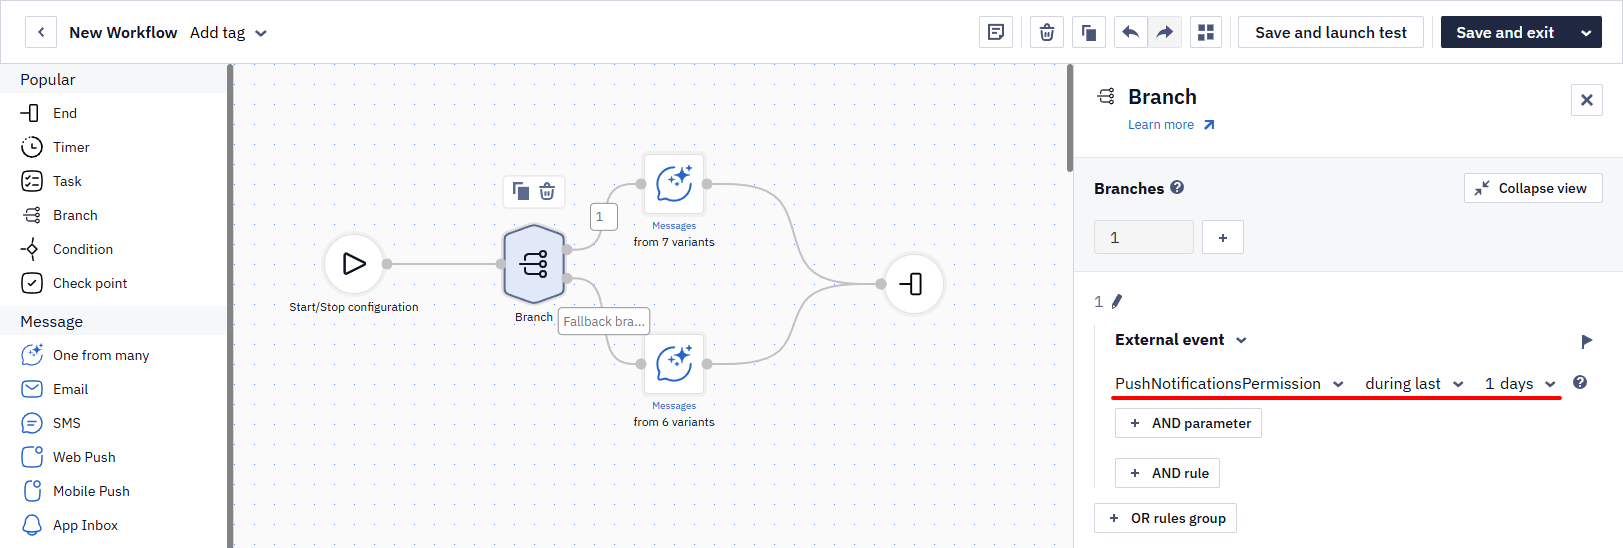
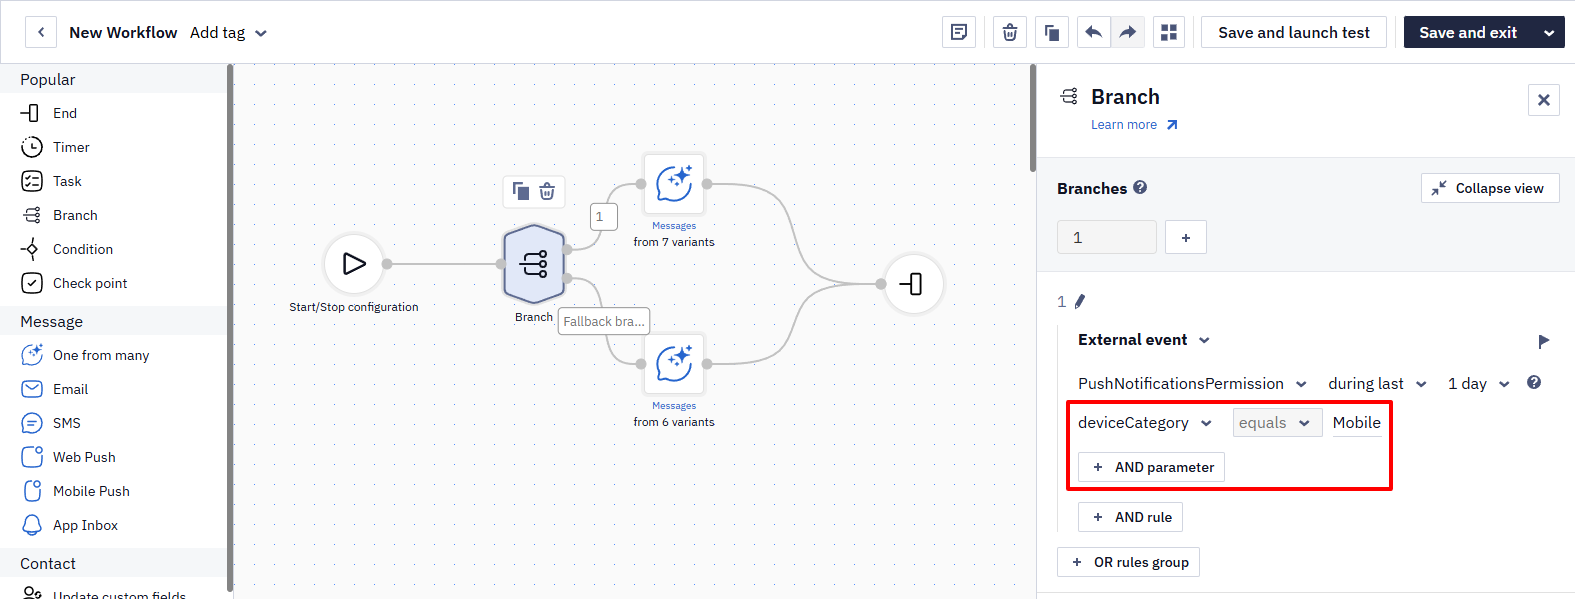
If you want to check the event parameter, click the AND parameter and specify the parameter name, its value, and one of the available validation operators, e.g., deviceCategory equals Mobile.
The rule looks at every event of the selected type that the contact received during the period, and the condition is met when at least one of them matches it.
The same parameter list includes Event count — a condition that checks how many times the event occurred within the selected period. Select the equals, greater than, or less than operator and specify the number. One rule can include only one Event count condition.
NoteThe time window is counted back from the moment the workflow started, not from the moment the contact reaches this Branch. Timers and other blocks before it do not shift the window.
The start of the window is rounded down to the previous 5 minutes, so it can cover more time than you selected — a 30-minute window reaches back up to 35 minutes.
Comparison with the start event parameter
Instead of a fixed value, the external event parameter can be compared with the value of the same parameter in the event that started the workflow.
For example, the tour_rating_show event starts a workflow with tour_id=123. In the External event rule, select tour_rating_submit and compare its tour_id with the tour_id value of the start event. The condition is met if a tour_rating_submit event with tour_id=123 is found among the contact's external events within the time window selected in step 2.
This way, each workflow run checks the action for a specific tour, even if one contact interacts with many tours. You don't need to store their identifiers in additional contact fields.
Only the parameters that are added to the External event rule and present in the event that started the workflow can be used for comparison.
Usage example
- Branch 1:
ProductViewed during last 7 daysANDcategory Equals Sneakers→ “Complete the look” (socks, care kit, laces) - Branch 2:
CartUpdated during last 7 daysANDcategory Equals Dresses→ Size & fit guide + matching accessories - Branch 3:
OrderPlaced during last 30 daysANDbrand Equals X→ Brand-loyal perks + early access - Fallback:
Didn’t match 1–3→ Browse best-sellers + personalized pick
Event in Messages
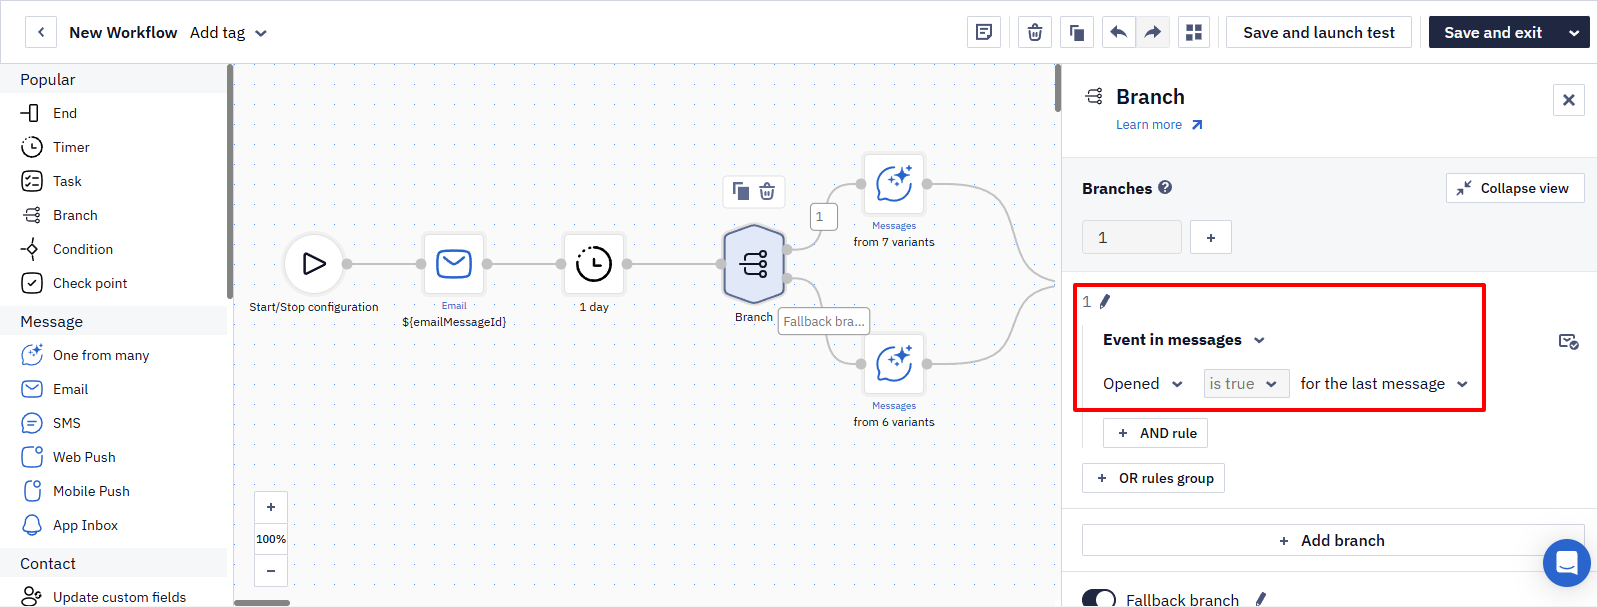
- Select message status: Delivered, Opened, or Clicked.
- Select condition:
- is true → the status occurred within the chosen scope.
- is false → the status did not occur within the chosen scope.
- Select scope:
- for the last message — checks the most recent Message block before this Branch.
- for all messages — checks across all earlier Message blocks in the workflow.
Opened has nothing to register for SMS, which has no open tracking.
Usage example
- Branch 1:
Clicked is true for the last message→ Flash-sale CTA with personalized picks - Branch 2:
Delivered is false for the last message→ Switch channel (SMS/push) + address validation tip - Branch 3:
Opened is false for the last message→ Web push/In-app: “New arrivals just dropped — shop now”
Segment Membership
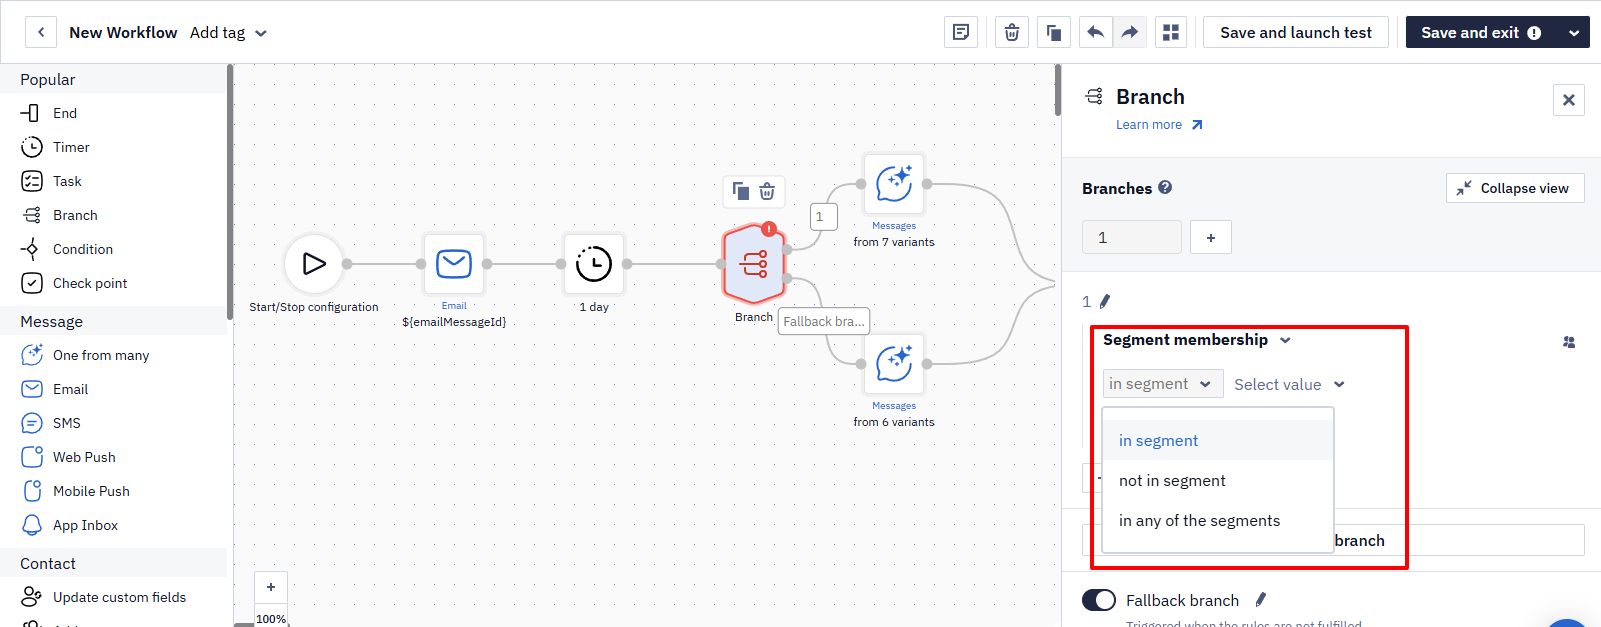
Select the condition In segment / Not in segment / In any of segments and specify the segment(s).
Usage example
The BackInStock Trigger:
- Branch 1:
Segment = VIP→ 24-hour early access, limited quantity, priority shipping. - Branch 2:
In any of the segments = BargainHunters, CouponUsers→ Promo code -10% for 48 hours + “Reserve your size.” - Branch 3:
Segment = ChurnRisk (90 days without purchases)→ Win-back: free shipping/easy returns, multi-channel reminder series. - Branch 4:
Segment = RepeatBuyers or HighLTV→ Bundle of compatible products + extra loyalty points. - Branch 5:
Segment = NewSubscribers (≤7 days)→ Welcome discount, short FAQ on shipping/sizing, soft deadline. - Fallback:
Others→ Standard “Back in stock” message without discount: product photo, “Buy now” CTA, easy-returns guarantee.
Current Day/Time
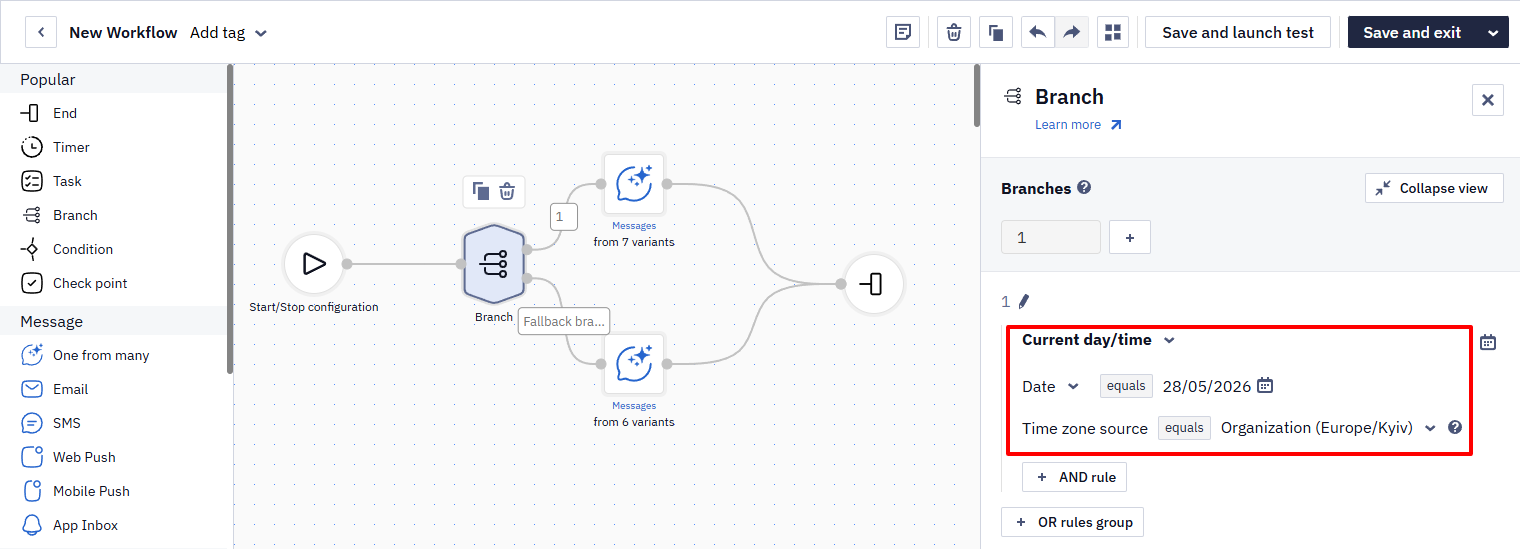
- Add a rule of type Current Day/Time.
- Select a validation parameter:
- Date
- Day of week
- Time
- Specify an operator, available depending on the parameter:
- Date — only Equals
- Day of the week — only Any of
- Time — only Between
- Specify a value:
- for Date — a specific date
- for Day of the week — one or more days
- for Time — an interval (from/to)
- Select a Time zone source:
- Organization — the validation is performed in the time zone set in your organization settings
- Contact — the validation is performed in the time zone set in the contact card
Usage Example
This type of rule is convenient to use for “quiet hours”, work windows, different weekday/weekend workflows, etc.
Channel Availability
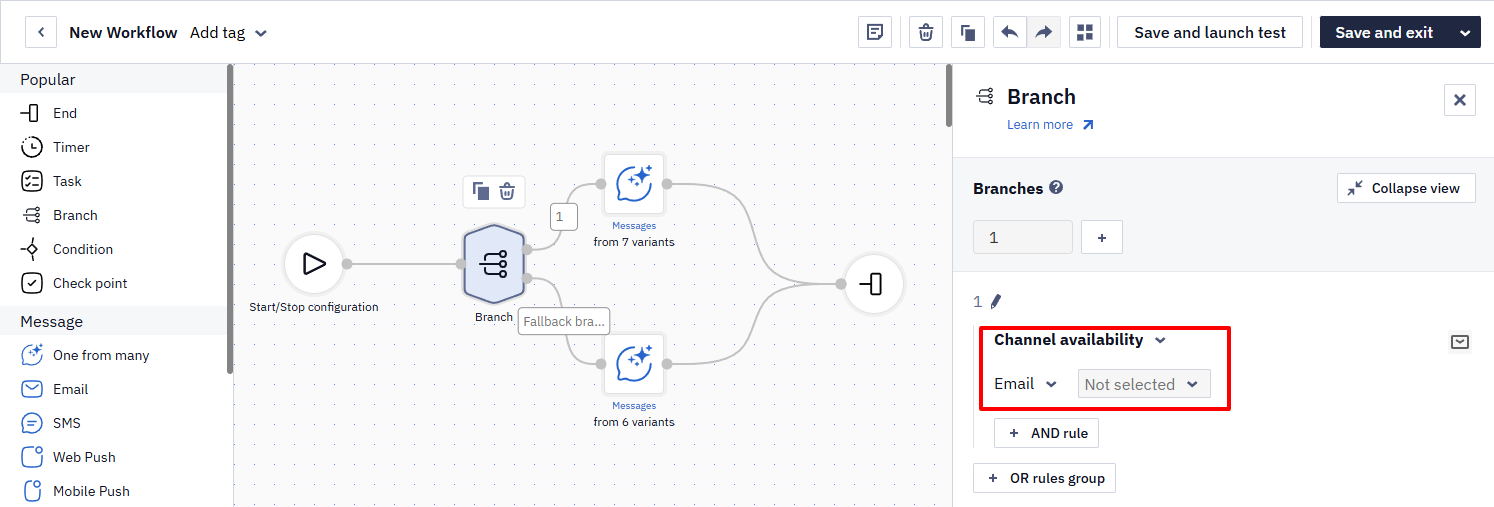
- Add a rule of type Channel Availability.
- Select the channel you want to check (for example, Email or Mobile Push).
- Specify the condition: Is available, Is unavailable, Any of the channels
Usage Example
- Branch 1:
Email available→ Send Email - Branch 2:
Email unavailableANDMobile Push available→ Send Mobile Push - Branch 3:
Email unavailableANDMobile Push unavailableANDSMS available→ Send SMS - Fallback: all channels unavailable → Add to segment No reachable channel / end workflow
AND / OR Rules
Inside a single branch, conditions are grouped into rule cards.
- Within one card, conditions are combined with AND rule (all must be true).
- OR rules group adds another card as an alternative set of conditions.
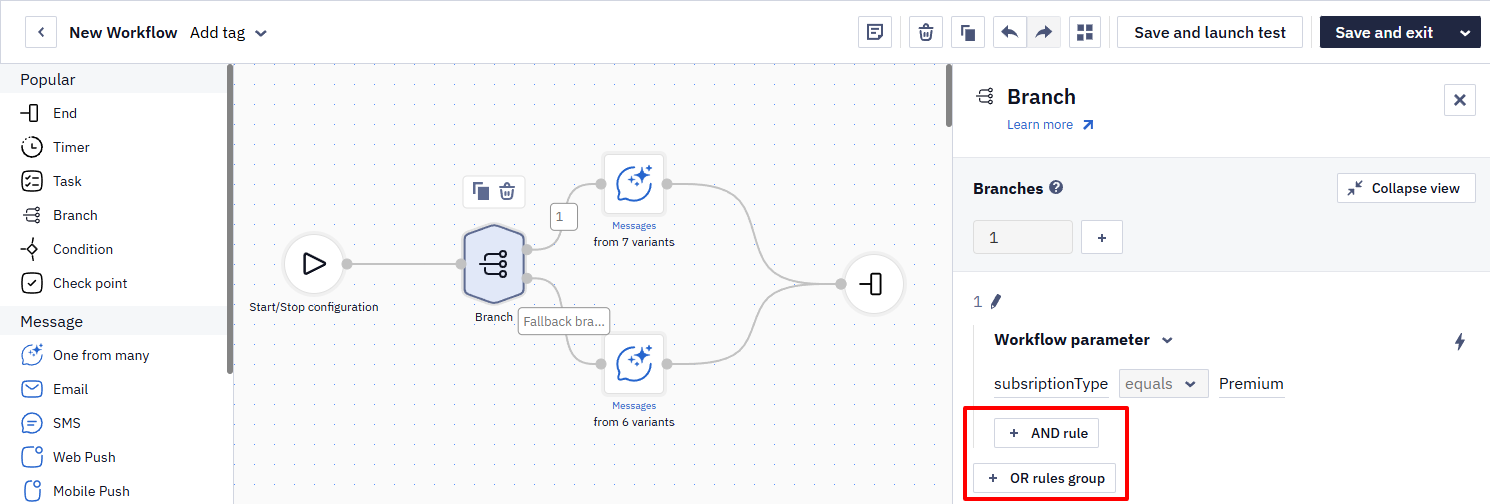
The branch passes if all conditions in any one card are true (Card 1 OR Card 2 OR Card 3, etc.).
If the conditions of more than one branch are true, the contact goes down the first branch in the checking order — not the one whose event is the most recent. Reorder branches with Check later or earlier.
Settings
- In your branch, add the first conditions — this becomes Rule card 1 (all conditions here use AND).
- Click OR rules group to add Rule card 2 (an alternative set).
- Configure the conditions in Rule card 2 (again, they’re AND-ed within the card).
- (Optional) Add more OR rules groups to create additional alternative cards.
Usage example
- Rule card 1:
loyaltyLevel Equals VIP - OR rule card 2:
orderValueBucket Equals High
→ Action: Send “Free Express Shipping — Today Only” message
Branch Actions
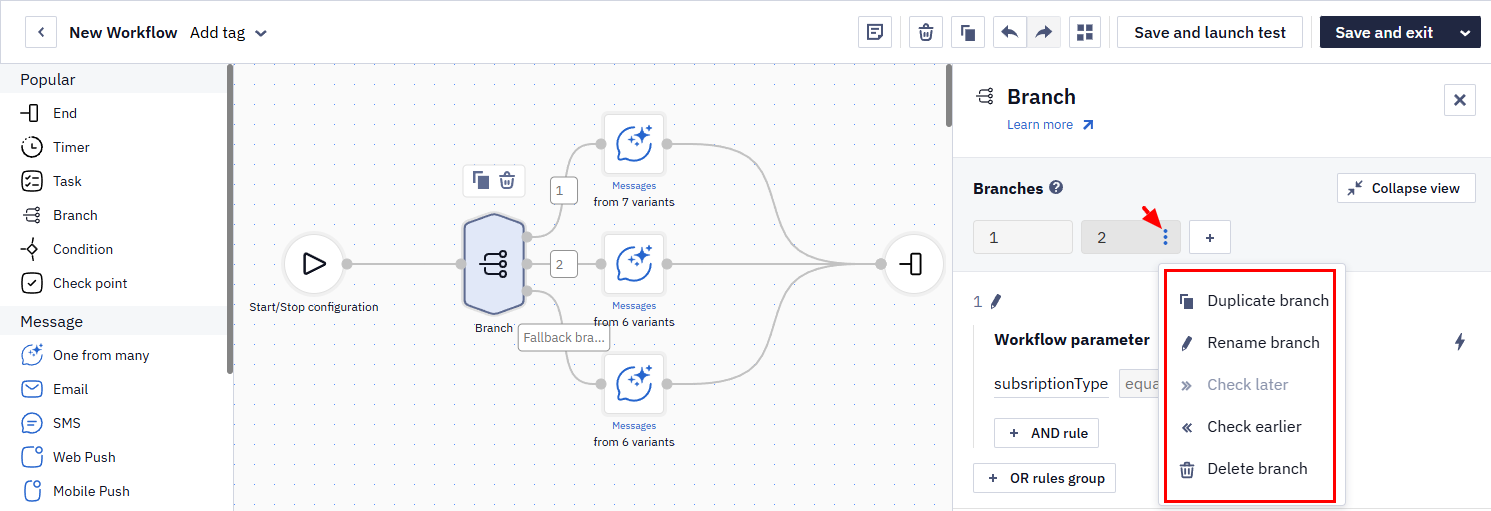
Created branches (max 20) have the following management options:
- Duplicate — copy a branch with all its conditions (using the button in the block settings or selecting the branch and pressing
Ctrl + Don Windows orCmd + Don macOS). - Rename — improve on-canvas readability with short, clear labels.
- Check later or earlier — change the priority of branch checking.
- Delete — remove an obsolete branch or rule.
Updated 3 days ago