
Creating Additional Fields
Additional fields in contact cards store specific information about contacts, such as personal promo codes, important dates, locations, and preferences. You can use this data for advanced contact segmentation and deeper personalization of communications.
Additional Fields Tab
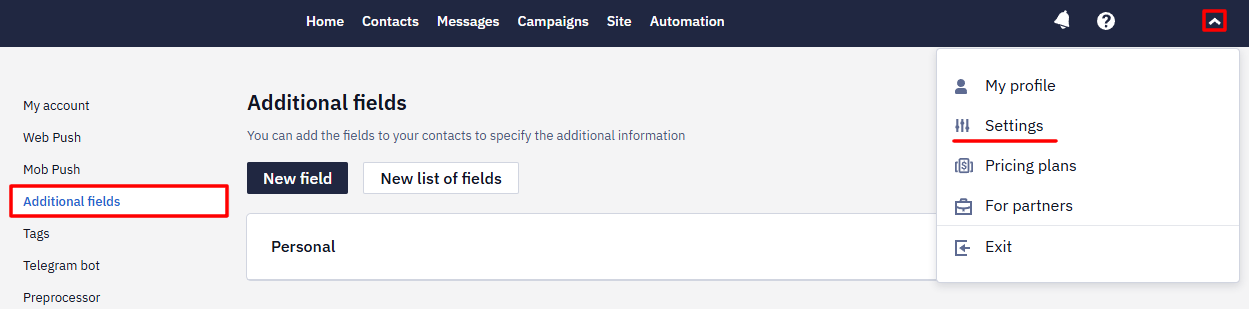
Additional fields are available in the account settings on the Additional fields tab. By default, the account contains only the Personal list with the Birthday and Gender fields.
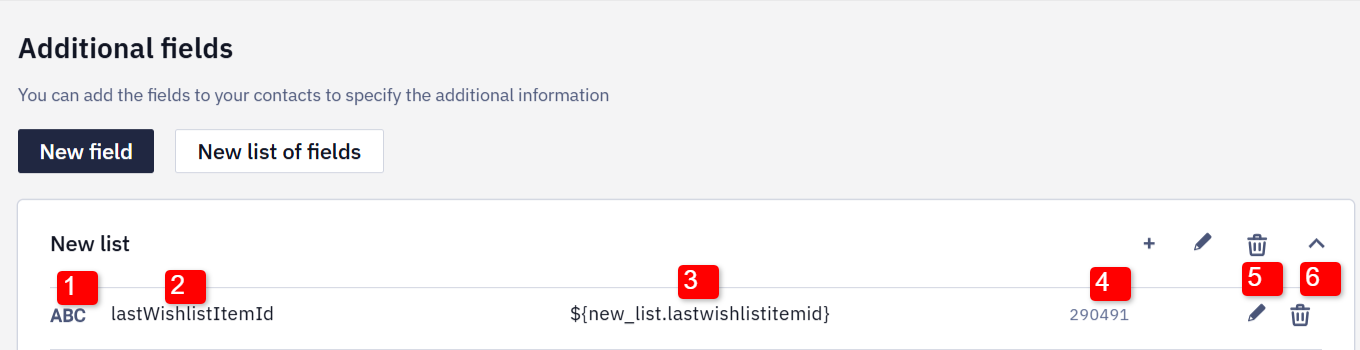
The additional fields list displays:
- Field type, such as text input or date.
- Field name.
- Variable used for message personalization.
- Field ID.
- Edit field button.
- Delete button.
NoteField variables use the
${list.name}format — the same format as in message editors. If a list or field personalization key contains Cyrillic characters or consists of numbers only, the variable is displayed in the fallback syntax${data.get('KEY')}— for example,${data.get('TEXTBOX.2312312')}.
The Additional fields tab shows how a field is defined — its type, name, variable, and ID — but not the values contacts actually have. To see the real values of a field, open a contact profile (Contacts → All contacts) and look at the field on the contact's additional fields tab. See Managing the Contact Profiles.
Building a condition on several values of one fieldIn a segment or workflow condition, use the one of operator and add each value as a separate item. Listing several values separated by commas in a single input doesn't work — the whole string is compared as one value.
You can create lists and add fields to them.
Creating a List
Lists help you group fields by purpose, such as personal data or product preferences. To create a field list:
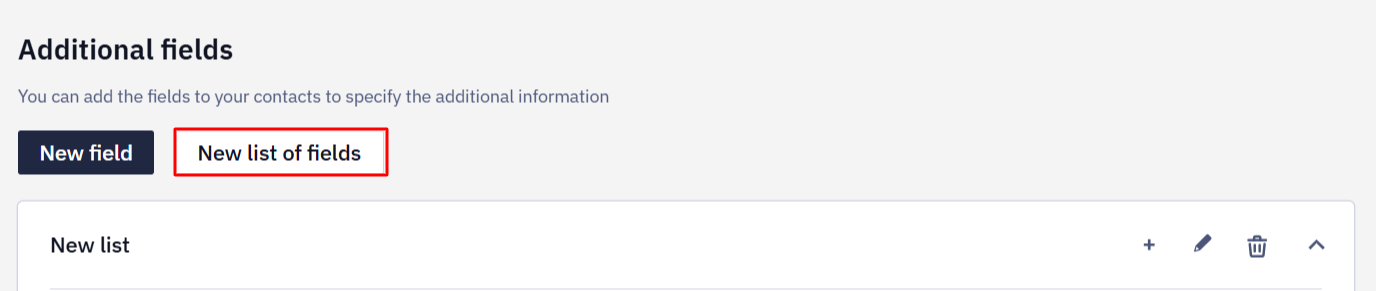
- Click New list of fields.
- Enter the list name.
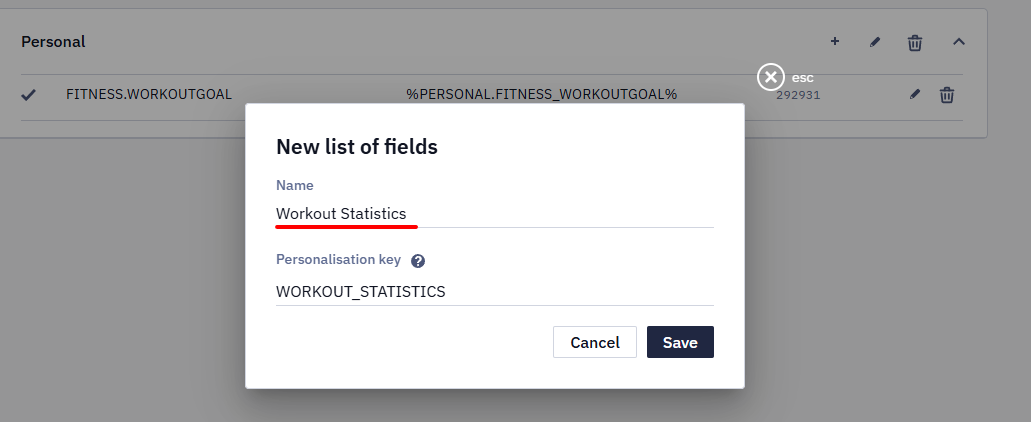
- If necessary, change the personalization key generated automatically from the list name. The key is used to build variables for the fields in this list, so choose a short and clear value.

- Click Save.
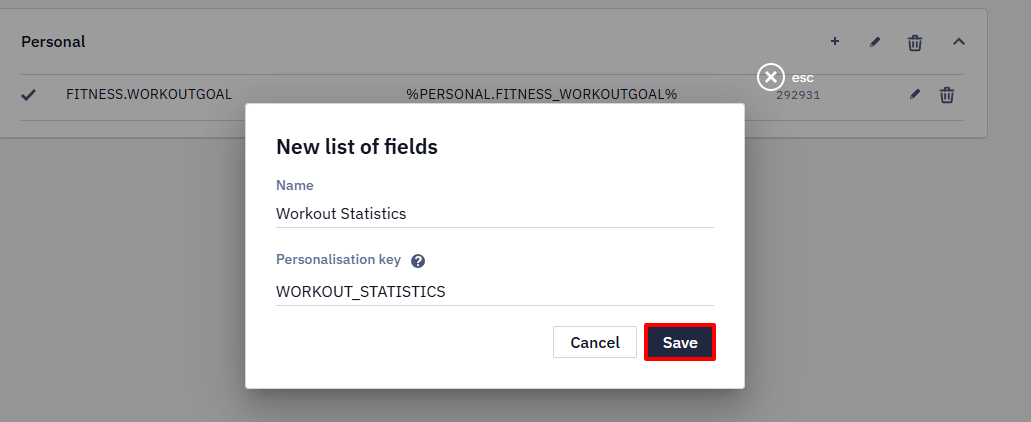
Note
- The list remains inactive until you add its first field.
- Before deleting a list that contains fields, delete all fields from the list.
Adding Fields
- Click the plus icon to create a field in the list.
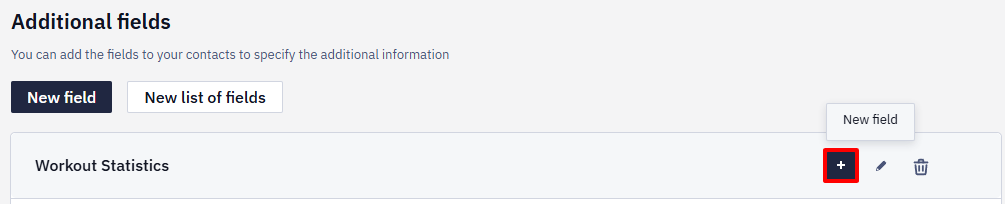
- Enter the field name and, if necessary, edit the automatically generated personalization key.
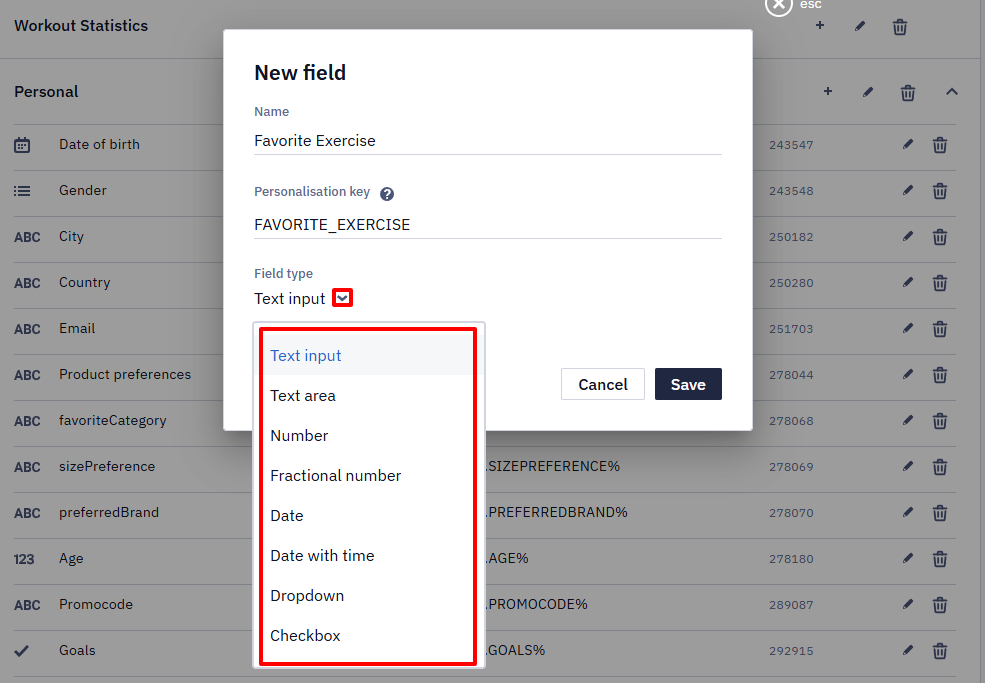
- Select the field type. Text input is selected by default.
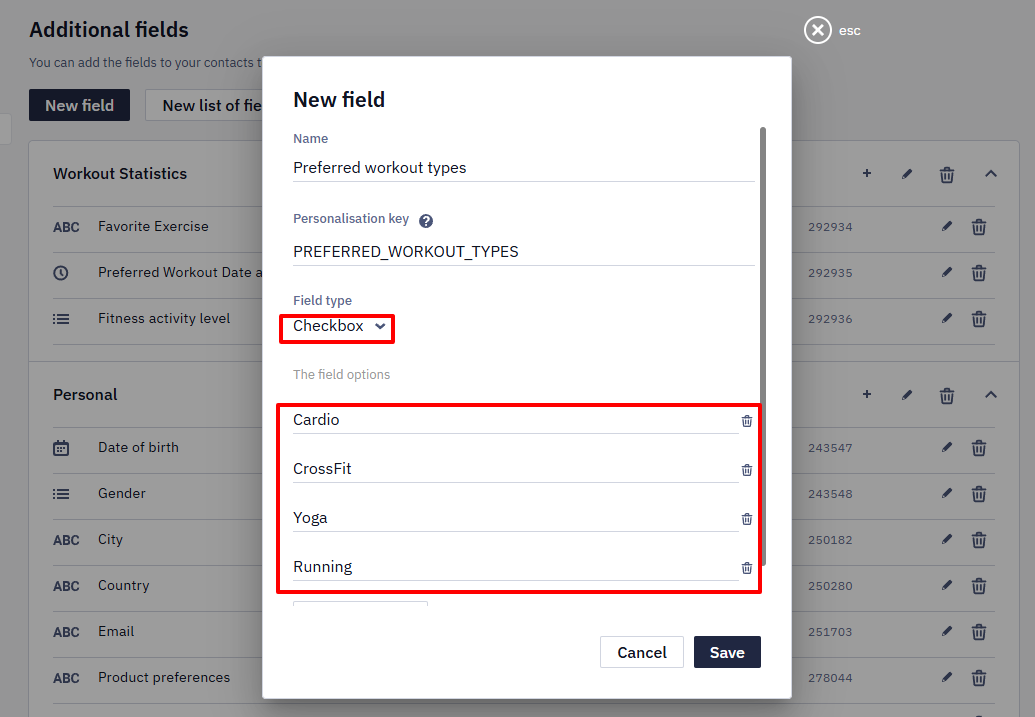
What you can't change laterA field's type can't be changed after creation — for example, you can't switch an existing field from Date and time to Date. The set of options for a Checkbox field is fixed when the field is created, so you can't add or remove options afterwards either. You also can't move a field to another list. In all these cases, create a new field instead. Values from the old field aren't transferred to the new one, and deleting the old field deletes its values.
Renaming a field is safe: the system references fields by their ID, not by name, so previously collected data isn't lost.
Field Types
Depending on the contact data type, the following field types are available:
- Text input can contain up to 1,000 characters, including letters and integers. Special characters are not supported. Use this type, for example, to store a contact's name or address.
- Text area can contain up to 5,000 characters, including letters and integers. Special characters are not supported. Use this type, for example, to store answers to open-ended questions.
- Number can contain only integer values from -2147483647 to 2147483647, such as an order ID or the number of bonuses.
- Fractional number can contain integers and decimal values, such as the total order amount.
- Date — values must use the ISO 8601 format:
YYYY-MM-DD. Use the Regular date option when creating dynamic segments for communication related to recurring events, such as anniversaries or birthdays.
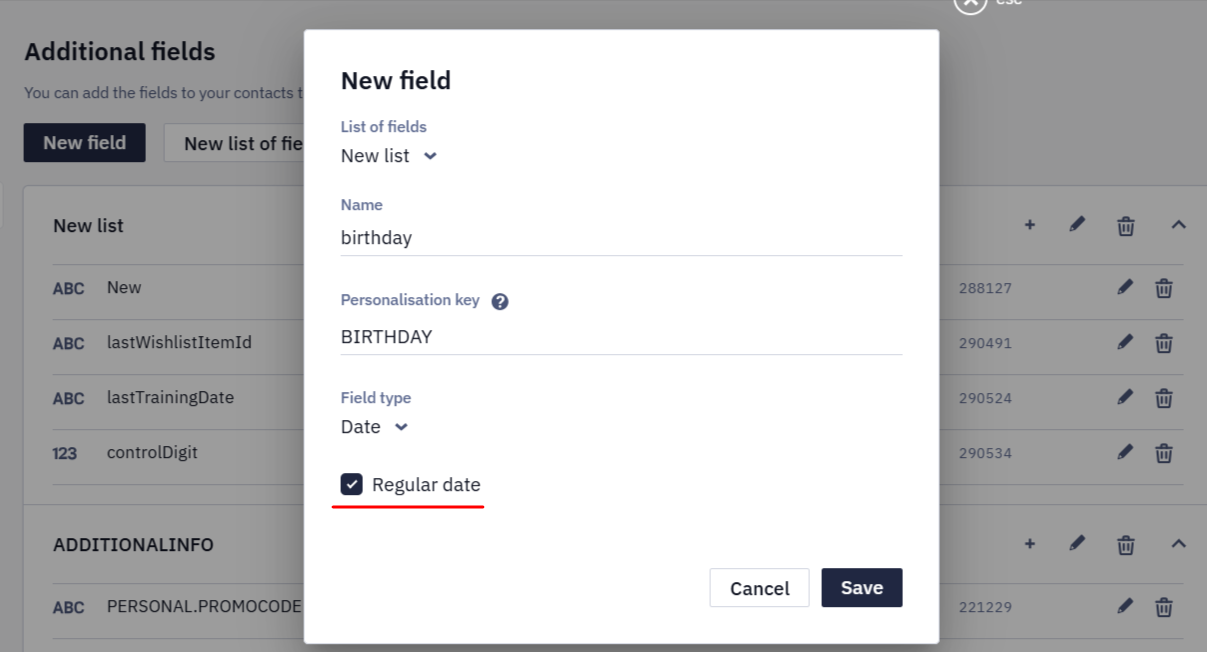
- Date and time — accepted formats are
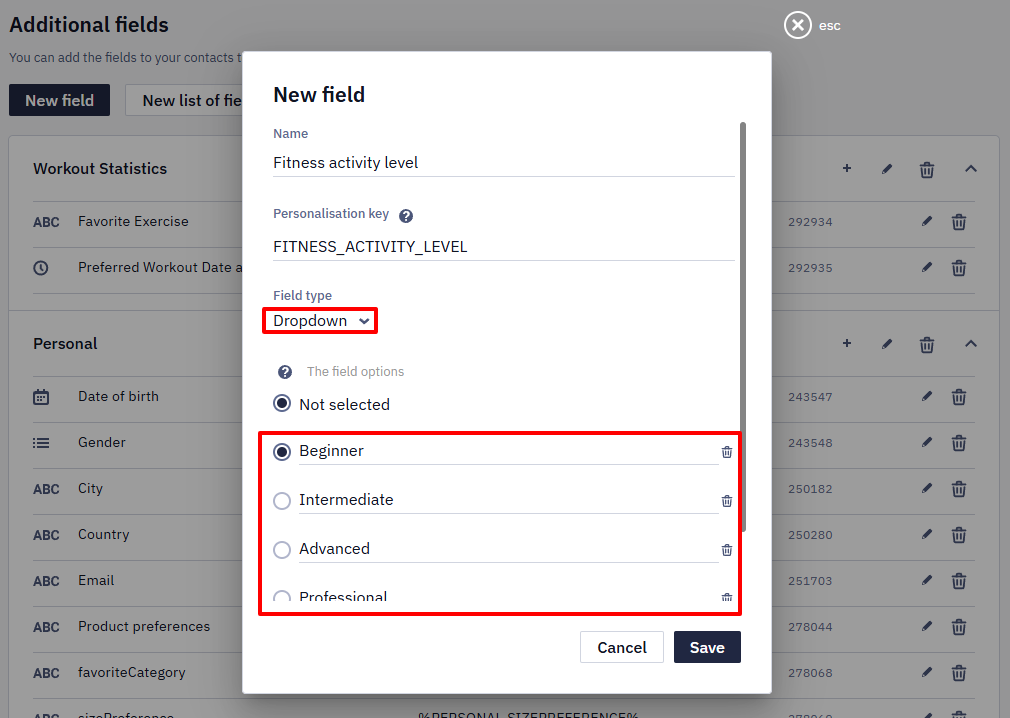
YYYY-MM-DDTHH:mm:ssZfor UTC andYYYY-MM-DDTHH:mm:ss±HH:mmwith a UTC offset. Unix time isn't accepted: convert the value to one of these formats. The value is stored as you send it: the system does not convert it to a single time zone, so an offset you pass is kept. Use this type for date-and-time values, such as promo code validity periods. - Drop-down list contains predefined values, such as a contact's gender, status, or language.
If a value doesn't match the field type, for example, a fractional number is passed to a Number field, the contact update request is rejected entirely: the other fields in the request aren't saved either.
ImportantDo not use a period (
.) in the field name. For example, useMarital statusorMarital_statusinstead ofMarital.status.
- Checkbox allows you to store multiple selected values.
NoteThere's no API endpoint for creating additional fields. The API below only lets you retrieve the list of existing fields (with Get additional fields) and update a contact's value for one of those fields — pass the field's numeric ID and the new value in the
fieldsarray of the Add/update contacts method, as shown below. Neither call creates a new field. You can create a field two ways: through this UI, or by importing a file with a column for it — unmapped columns are auto-created as new fields during field mapping. File import only supports the Text input, Text area, Number, Fractional number, Date, and Date and time types; Drop-down list and Checkbox fields still need to be created manually, since their predefined option lists aren't set during import.To replicate the same field set across multiple accounts, use Get additional fields to list the field names, types, and allowed values from one account, then recreate them in each other account — manually, or for the supported types, by importing a small file (for example, one placeholder contact with a column per field) to auto-create them. The field definitions remain even after you delete the contact that created them. Avoid uploading real customer data to another account just to replicate fields — use placeholder data instead.
Uniqueness of Additional Field Values
An additional field can't be given a uniqueness requirement. The same value can be written to several contacts, and the system doesn't mark such matches as duplicates.
The interface has no separate search for duplicates by additional fields. To find matching values, export the contacts to CSV and compare them on your side. Leave the Export Email only switch off so that the file includes all fields — see Using the All Contacts Tab.
Working with Additional Fields via API
Creating Fields
Create the field in the interface first, then read its ID with Get additional fields and pass that ID when you send contact data. The API writes values into fields that already exist; it does not create them.
Take this into account when you set up several accounts: the field structure has to be recreated in each account through the interface. For what else does not carry over, see Transferring Content Between Accounts.
Retrieving the Field List
To retrieve additional field lists and their IDs, keys, types, and allowed values, use the Get additional fields method:
GET /api/v1/additionalfields
You can pass the ID returned in additionalFields[].id as fields[].id when adding or updating contacts.
After you create an additional field, synchronization may take up to one hour. Until synchronization is complete, the field may be unavailable through the API.
Updating a Checkbox Field
To write or update a Checkbox field using the Add/update contacts API method, pass the numeric field ID in the fields array. Separate multiple values in the value parameter with commas:
{
  "contacts": [
    {
      "channels": [
        {
          "type": "email",
          "value": "[email protected]"
        }
      ],
      "fields": [
        {
          "id": 87166,
          "value": "Chinese,Italian"
        }
      ]
    }
  ],
  "dedupeOn": "email",
  "customFieldsIDs": [
    87166
  ]
}
In customFieldsIDs, specify the IDs of the additional fields to update. This parameter is required when updating an existing contact. Only the fields listed in this array are updated.
A value outside the field's list of valid values is rejected with 400 and the message '<field name>[<id>]' does not support value '<value>' — the quoted part is the field's name, not its type. An empty value is not an error: it clears the field, and the contact comes back without it in the next response.
Clearing a Field's Value in Bulk
There is no separate action to clear an additional field for many contacts at once. Use one of two ways:
- Import the contacts again with that field's column left empty and Import empty values enabled.
- Send the Add/update contacts request with the field's ID in
customFieldsIDsand an empty value for it.
Updating Additional Fields via SDK
Use the field's personalization key — the LIST.FIELD pair, for example TRAININGAPP.GOAL — as the key when updating additional fields through the SDK.
The personalization key is shown in the field editing window. The variable in the field list is the format for substitution into messages: it is displayed in curly braces and in lowercase. For the SDK, copy the personalization key value shown in that window.
NoteThe SDK does not validate additional fields on the client side — the data is passed to the server as is. If a passed field does not exist in the account, the request fails with an error and the update is not applied, including the fields that do exist. Make sure the field is created in the account before sending it from the app.
The app doesn't receive that error, so the call can look successful while nothing is written. Enable debug mode to see the SDK's request and response logs.
A sign of this problem is that new values don't appear in the contact card: after adding a field to the app, check the card of a test contact. Once you create the field in the account, the SDK won't resend the same values until they change. To get a value into the account after you create the field, change it in the app.

Android example:
val userAttributes = UserAttributes(
    email = user.email,
    fields = listOf(
        UserCustomField(
            key = "TRAININGAPP.GOAL",
            value = "lose weight"
        )
    )
)

val user = User(userAttributes = userAttributes)

Reteno.instance.setUserAttributes(
    externalUserId = "USER_ID",
    user = user
)
iOS example:
let userAttributes = UserAttributes(
    email: user.email,
    fields: [
        UserCustomField(
            key: "TRAININGAPP.GOAL",
            value: "lose weight"
        )
    ]
)

Reteno.updateUserAttributes(
    externalUserId: "USER_ID",
    userAttributes: userAttributes
)Custom Fields in Widget Integrations
All integrations available in the widget builder support passing widget data into custom fields on the integration's side. For most integrations, the widget builder can fetch the list of existing custom fields directly from the integration so you can select the target field. For a few integrations, this list can't be fetched — you need to know the target field's key. Some of these integrations still let you create a new custom field directly at the point of subscription, even though the existing list can't be fetched.
| Integration | Fetch existing custom field list | Create new field at subscribe time |
|---|---|---|
| Klaviyo | Not supported | Not supported |
| Omnisend | Not supported | Supported |
| Pipedrive | Not supported | Not supported |
| SalesDrive | Not supported | Supported |
| Shopify | Not supported | Not supported |
| Userlist | Not supported | Supported |
Updated 23 days ago