
Conditions Blocks
Conditions blocks check a contact's data or behavior against a rule and route them down a matching path in the workflow. Most blocks run a single check and split the workflow into two paths — Yes and No — based on the result. Split divides the workflow into up to 10 weighted branches, and Branch evaluates several rule sets top-to-bottom and sends the contact down the first one that matches.
Use Conditions blocks to make a workflow react to who a contact is and what they've done — for example, checking whether they opened a previous email, belong to a segment, made a purchase, or have a specific value in a custom field, then sending them down a different path accordingly.
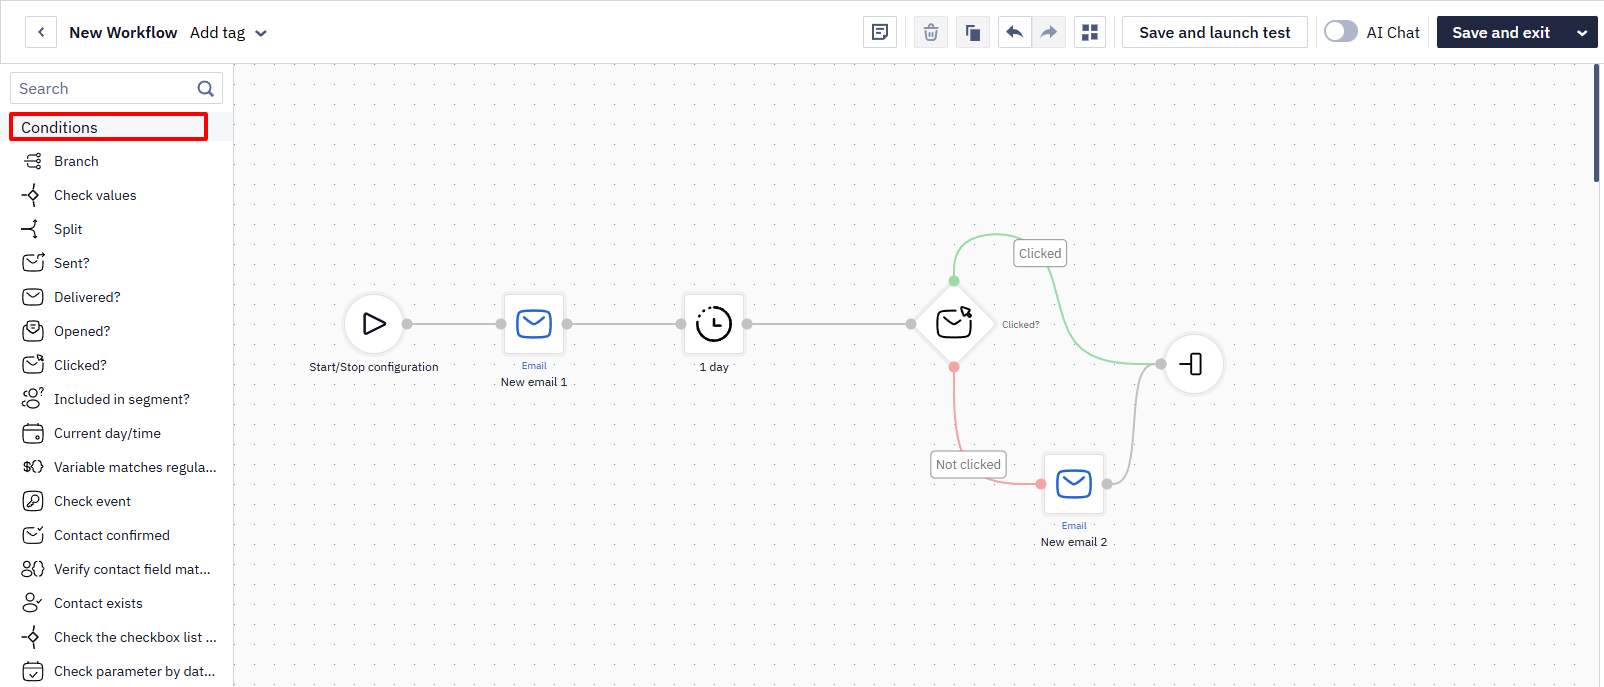
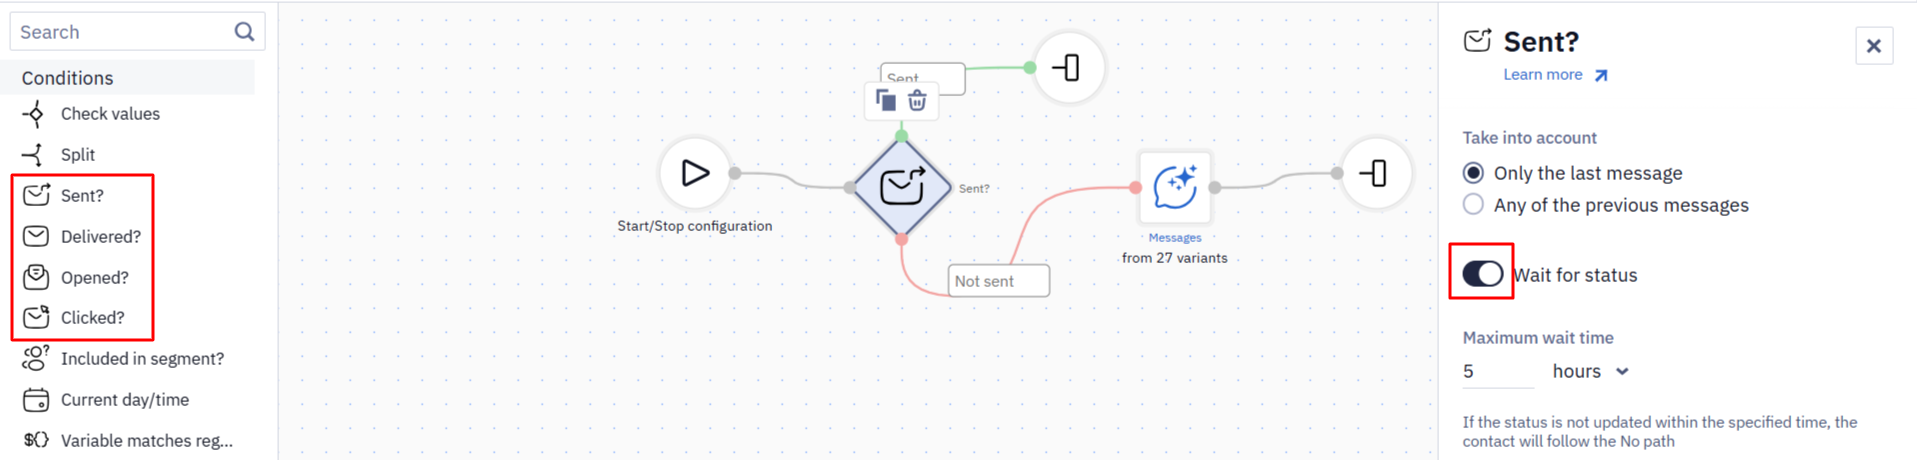
The Conditions group contains the following blocks, in the order they appear in the panel:
The following blocks cannot be attached to the Start block:
- Sent?
- Delivered?
- Opened?
- Clicked?
There's no way to launch a new workflow when a contact reads (opens) an email — an "email read" event isn't available as a workflow trigger. The closest available trigger is a link click, which starts a separate workflow via its own event rather than reacting within the same workflow.
Branch
The Branch block lets you define multiple alternative paths in one place. Instead of chaining separate Condition blocks, you add branches inside a single block and set rules for each — the system evaluates them top-to-bottom and sends the contact down the first branch whose rules match.
Branch rules can be based on the workflow parameter, a contact field, an external event, engagement with earlier Sending blocks, segment membership, current day/time, or channel availability. It's typically used to replace long chains of Condition blocks with one compact, easy-to-review decision point — for example, routing contacts by order value, favorite category, or channel availability.
More detailed information about the Branch block >
Check Values
The condition allows you to check:
- Values in event context parameters: for example, promo code type.
- Values in contact fields: for example, subscriber city.
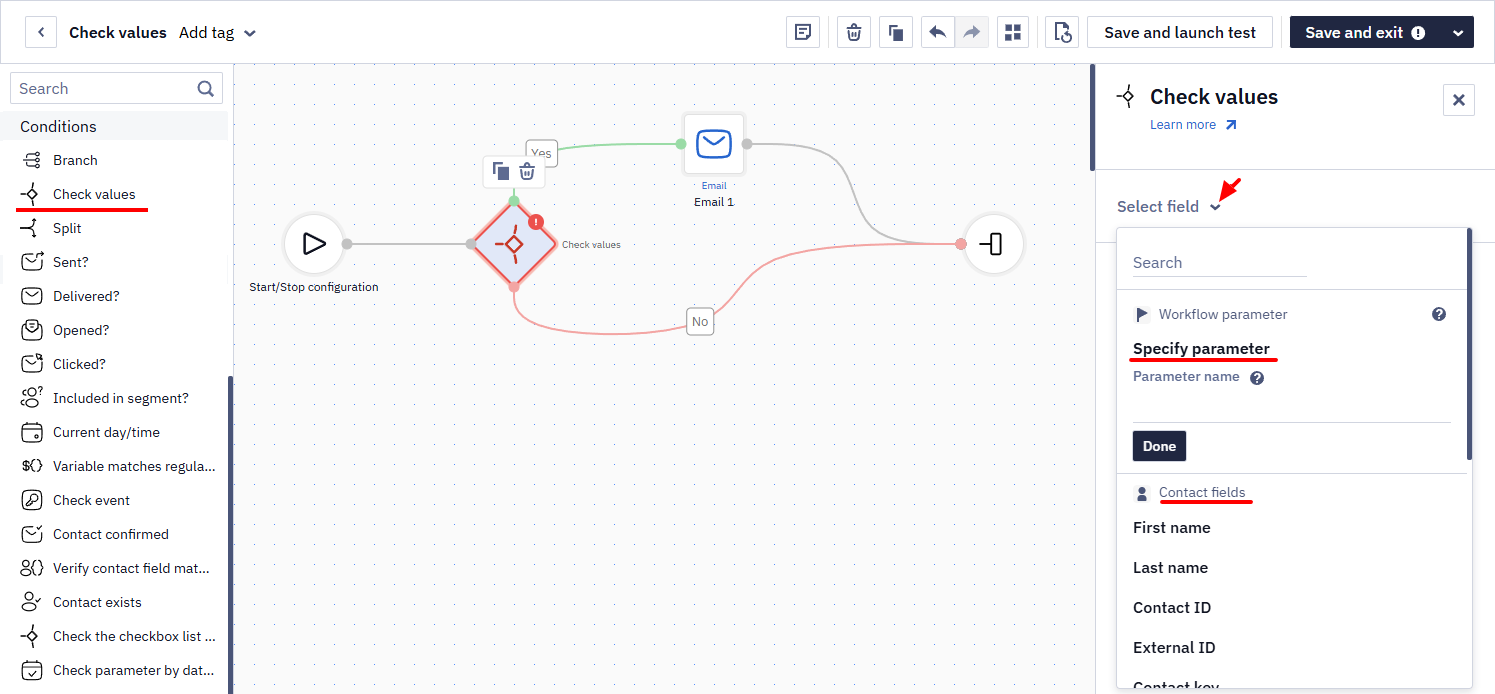
- Click Select rule.
- Specify an event parameter and its value, or select a contact field from the list.
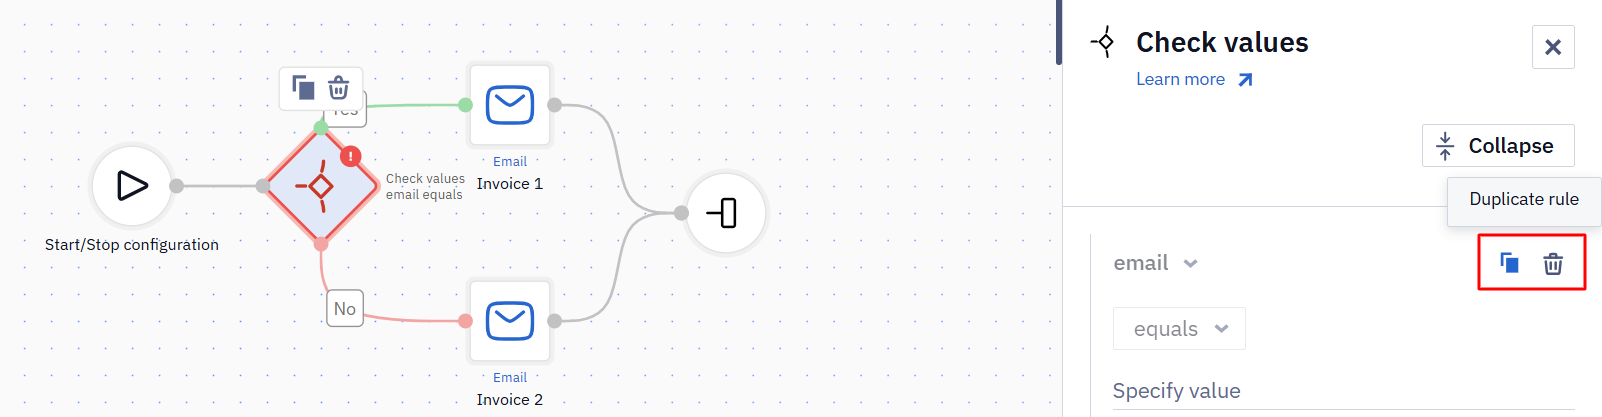
Each individual rule has Duplicate Rule and Delete Rule buttons. Use them to copy a rule with all its settings or delete only the selected rule.
- You do not need to wrap the parameter name in
${}. - Event parameters can be passed in either numeric or string format.
-
Select one of the available validation operators depending on the event parameter or field type.
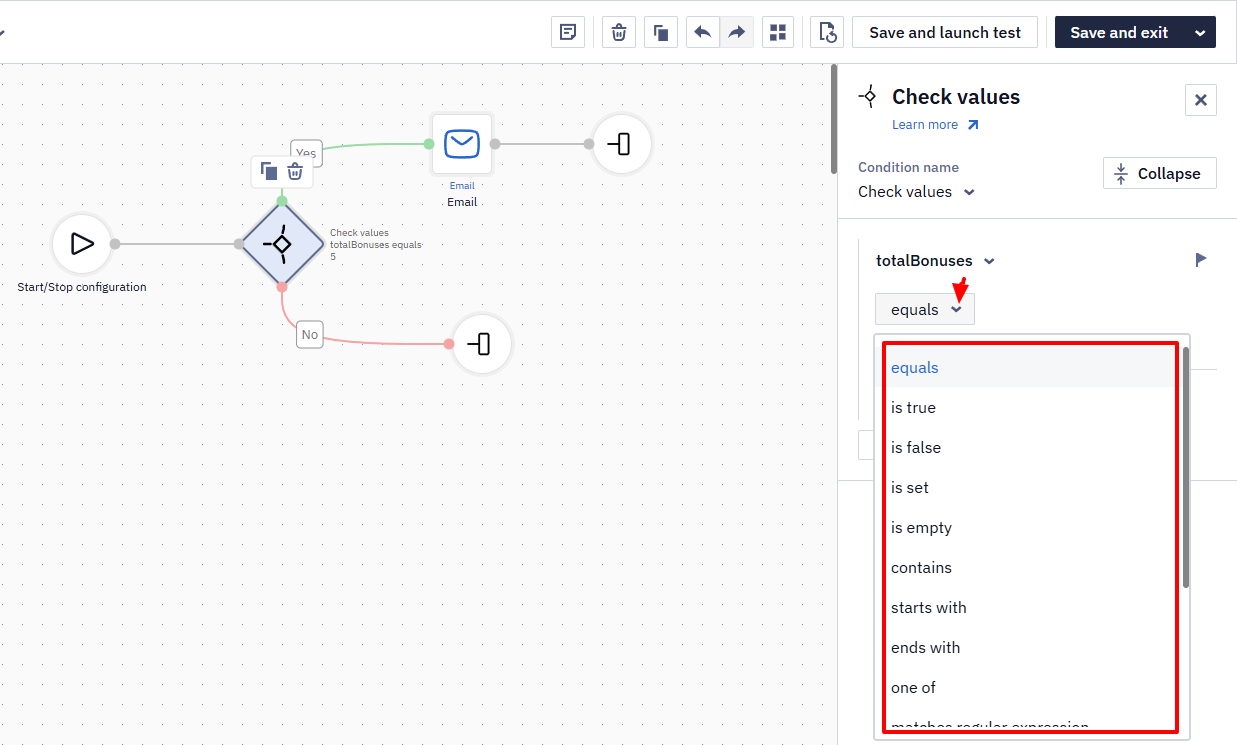
Operator Event parameters Number field type Text field type Dropdown field type equals ✓ ✓ ✓ ✓ does not equal ✓ ✓ ✓ is false ✓ ✓ ✓ is true ✓ ✓ ✓ is set ✓ ✓ ✓ ✓ is empty ✓ ✓ ✓ ✓ contains ✓ ✓ does not contain ✓ starts with ✓ ✓ does not start with ✓ ends with ✓ ✓ does not end with ✓ one of ✓ ✓ ✓ is not one of ✓ ✓ matches ✓ ✓ between ✓ ✓ greater than ✓ ✓ greater than or equal ✓ ✓ less than ✓ ✓ less than or equal ✓ ✓
The parameter name does not need to be surrounded by special characters ${}.
If a parameter is explicitly passed with the value null, the system treats it as filled with the value null rather than empty — so the is empty and is set operators won't behave as expected for it. To have a parameter correctly evaluate as empty, omit it from the request entirely instead of sending it as null.
You can add multiple checks using AND/OR logic — there is no limit to the number of conditions.
This allows you to avoid creating separate dynamic segments in the workflow.
To match one field against several values, use the one of operator and add each value as a separate entry. Listing values separated by commas in a single input does not work — the whole string is compared as one value and the condition never matches.
To see which values a custom field actually holds, open a contact profile and check the field in the contact card and on the tab with additional contact fields. Use those values in the condition: the comparison ignores case, but a value that differs in spelling is treated as a different value.
More about:
Split
The block is used to split-test messages. It splits the workflow into several branches (up to 10) and arbitrarily divides contacts between them. By default, the number of branches is 2, the probability of each of them being triggered is 50/50.
Contacts are distributed at random, so the actual split only approximates the ratio you set instead of matching it exactly.
Contacts are assigned to branches by random numbers, so the actual distribution is approximate rather than exact. On small volumes, the deviation is more noticeable: branches configured as 50/50 can produce, for example, a 58/42 result. The distribution evens out as the number of contacts grows.
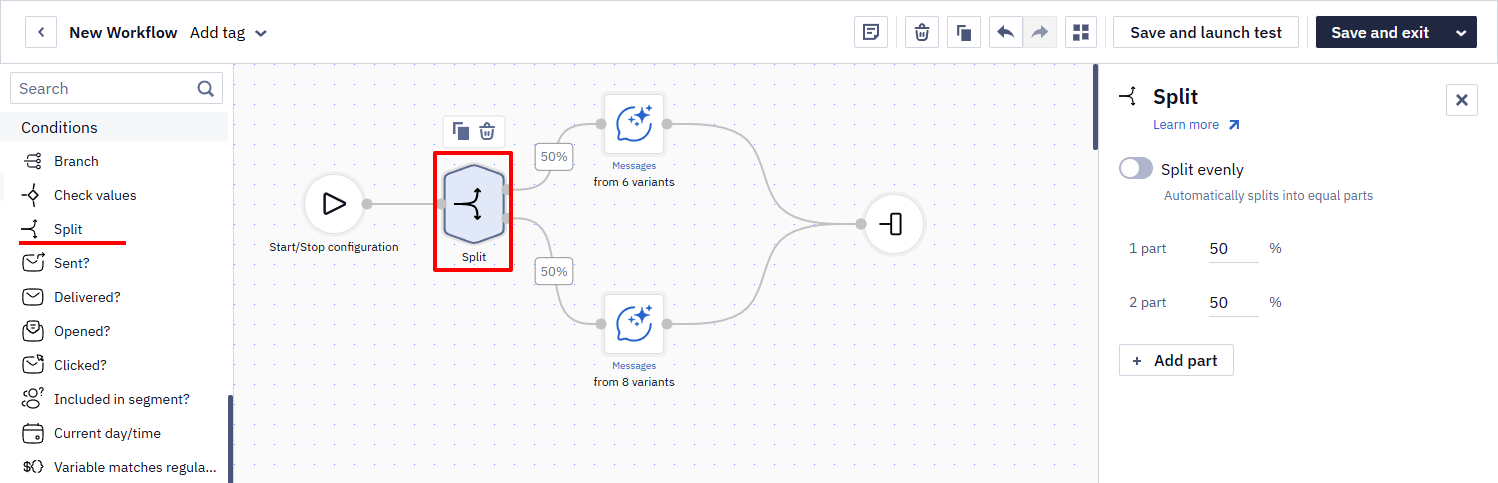
For example, you can create a workflow to test the effectiveness of two different communication channels or two campaign types within one channel by setting the same split percentage.
The above example is a workflow testing Email and Viber. Based on the set percentage, one half of your subscribers will receive an email, and the other half will receive a Viber message. Further analysis will help determine which channel is more effective.
Sent?
The Sent? block checks whether a message — or a chain of messages placed in the workflow before this block — was actually sent.
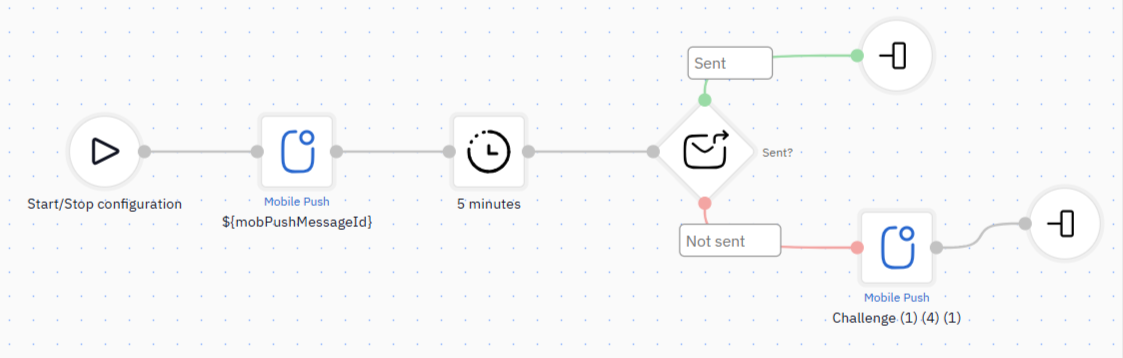
The example above shows the workflow where the mobile push with the experimental recommendation algorithm is sent first. If there is no data to generate such recommendations, the message is not sent.
At the same time, in addition to the Delivered status, mobile push notifications also have the In Progress status. It can take a long time between sending and delivery, so the Delivered? check is unsuitable.
If the check shows the system did not send the first message, the workflow will send the second one with a universal recommendation algorithm.
For the check to work, the system needs time to register the fact of sending, so add a 5-minute Timer block before the check — contacts whose first push was not sent will receive the fallback message within minutes. Wait for status fits here too: set Maximum wait time to a few minutes, and the contact takes the Sent branch as soon as the status appears, instead of waiting out the whole timer. For details on the option, see Waiting for a Status Update below.
The Sent?, Delivered?, Opened? and Clicked? blocks check messages within one workflow and do not consider whether a similar action has been performed with a message in another workflow.
The same applies to a scheduled campaign running alongside a workflow: they are independent runs. A separate broadcast campaign is not cancelled automatically by a workflow, and there is no deduplication or priority just because the message ID is the same — a contact can receive both. Only a separately configured frequency control / Annoyance Level can limit this, and it is available for Email and Mobile Push.
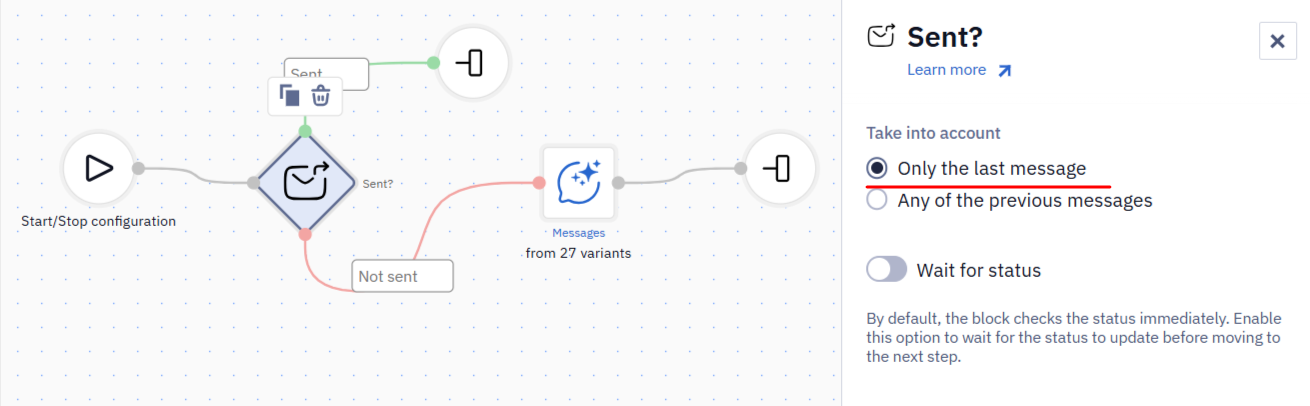
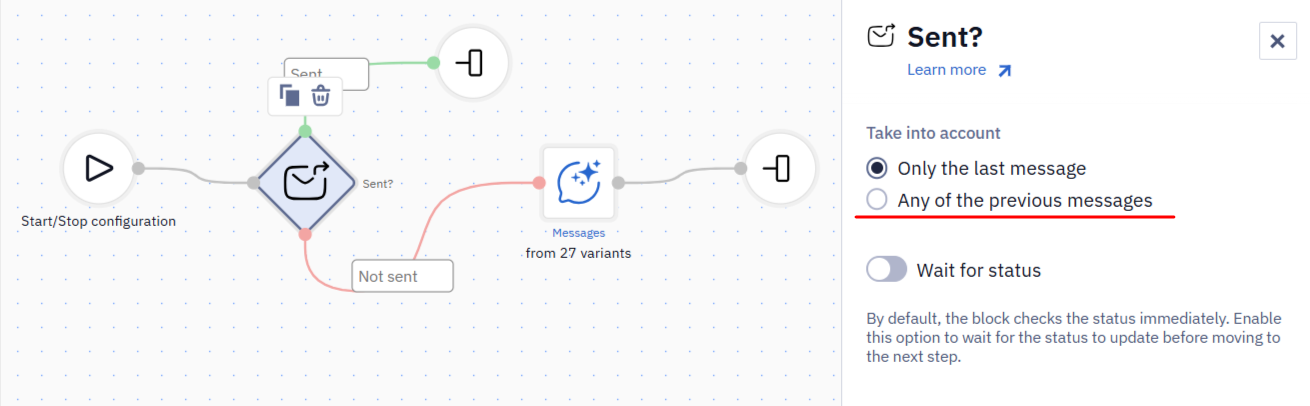
Each of these four blocks has the Take into account selector with two check options. The logic described below applies equally to each block, depending on the status it checks.
- Only the last message. The block checks only the last message before it. If the message has the required status, the workflow continues along the Yes branch. If the message does not have this status, the workflow continues along the No branch.
- Any of the previous messages. The block checks all previous messages in the workflow. If at least one of them has the required status, the workflow continues along the Yes branch. If none of the messages have this status, the workflow continues along the No branch.
NoteWe recommend also using a Timer block before the Sent?, Delivered?, Opened?, and Clicked? blocks. Otherwise, for a major part of your subscribers, the workflow will run the No path.
Since the system immediately checks the condition compliance, and subscribers can't immediately respond to your campaign, there is no reliable data to run the Yes path.
Delivered?
The task of this block is to check whether the message was delivered to the user and, depending on the result, adjust the further flow of the workflow.
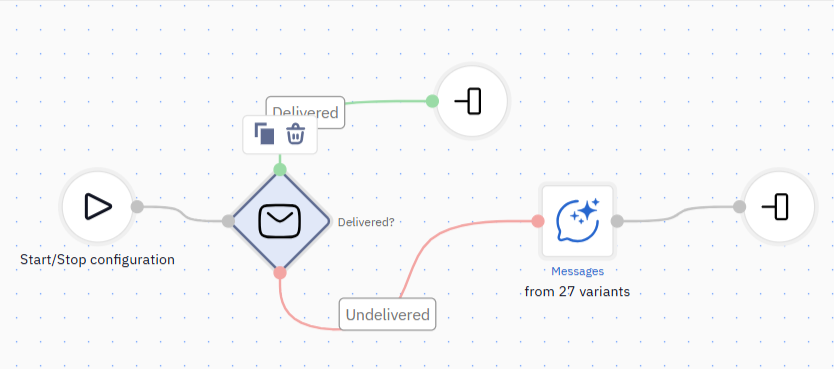
In this example, subscribers who received the first message would eventually receive the second one, and the rest would be added to the segment with invalid contacts. This way, the block helps you assess the effectiveness of email as a communication channel and reduce the error rate in subsequent campaigns.
Opened?
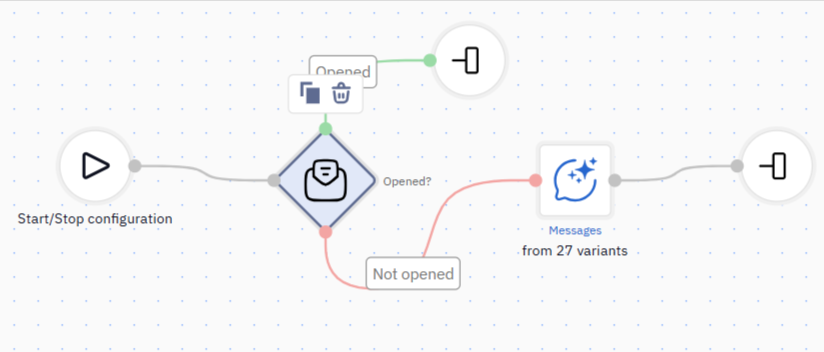
This block checks whether the recipient opened the message and, depending on the result (Yes/No), splits the workflow into two paths. If the recipient hasn't opened your email within a certain period, you can test a different subject line or send a Viber message or an SMS with the same content. This increases the chances of getting the desired action.
Clicked?
With this block, you can check whether the contact clicked on the message and set alternative actions based on the results of the check. The block takes into account any click on any link except the unsubscribe link. Note that you can't choose to check a specific link.
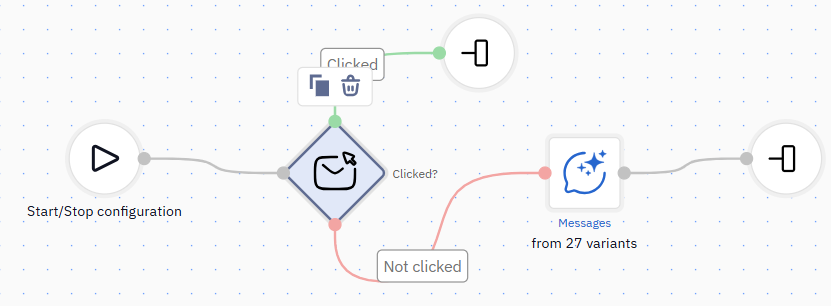
In this workflow, the contacts who clicked the link in the first email and are potentially interested in your offer receive the next email with a special discount, more details, or the benefits of the presented product or brand. For those who didn't click, the workflow ends — for this group, you can prepare other arguments or additional communication tools.
Waiting for a Status Update
By default, the Sent?, Delivered?, Opened?, and Clicked? blocks check the status once when a contact reaches them. Enable Wait for status to hold the contact in the block until the required status appears:
- As soon as the status appears, the contact immediately follows the Yes path.
- If the status does not appear within the specified time, the contact follows the No path.
In Maximum wait time, specify how long the block should wait for the status. The wait time counts from the moment the contact reaches the block. Set the value in minutes, hours, or days (the minimum is 1 minute); the maximum is 30 days (720 hours).
A Timer before the block and Wait for status solve different tasks. With a Timer, all contacts are checked once when the timer ends. With Wait for status, the contact follows the Yes path as soon as the status appears, and the No path fires only after the maximum wait time. For a critical workflow, set the timing according to your business logic — 5 minutes is not a delivery guarantee.
Included in Segment?
The block checks whether the contact is included in a certain segment.
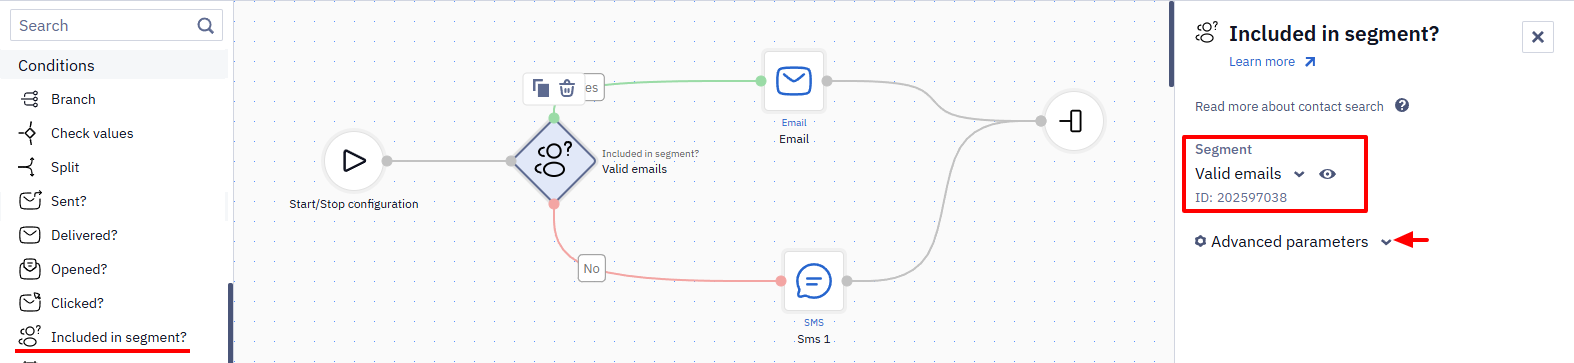
The block has one basic parameter — Segment. In the field, select the segment to check for the contact's membership in that segment. You can also create a Dynamic or List segment without leaving the workflow editor.
After selecting a segment, you can open and edit it directly in the workflow editor. When you finish editing, you return to the block settings with the segment still selected.
In this workflow, the subscribers who are included in the segment Valid email receive an email; the subscribers who aren't included receive an SMS. Similarly, you can use other subscriber data (activity, orders, personal data, etc.) to create the most effective and personalized campaigns.
The block also contains advanced parameters, which are detailed in a separate article.
A Newly Added Contact May Fail the CheckThe result of a group or segment membership check can take up to an hour to update — the exact delay depends on the load on the system. A contact you have just added to the group can therefore follow the No branch even though the account already shows them in it.
If you need to check whether a contact has unsubscribed, the only way is a dynamic segment filtered by subscription status. Set the Timer to at least an hour so the data has time to update.
For contacts that were just added, it is better to branch on direct data than on group membership — use Check Values with a contact field or Verify Contact Field Matches Event Parameter with an event parameter.
Current Day/Time
The block checks whether the current path is triggered based on a certain date, weekday or time.
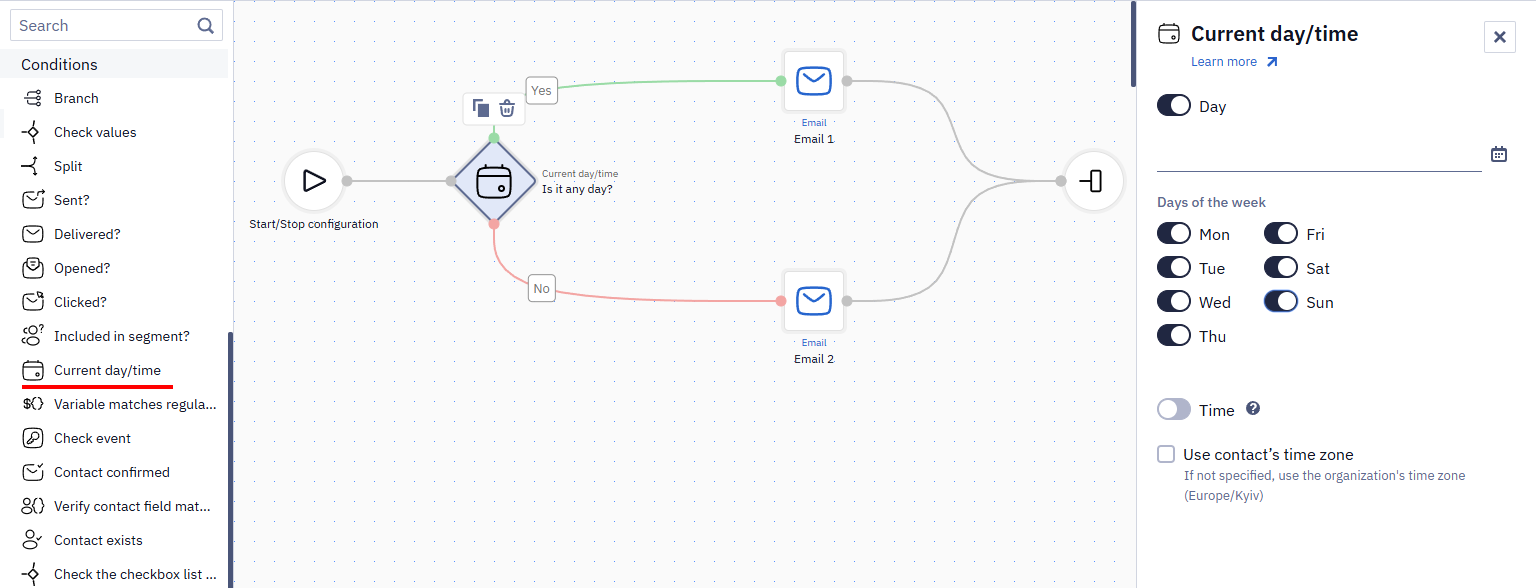
You can set up the following conditions for sending:
- certain day of the week;
- specific date;
- specific time;
- specific time on a specific date/day of the week.
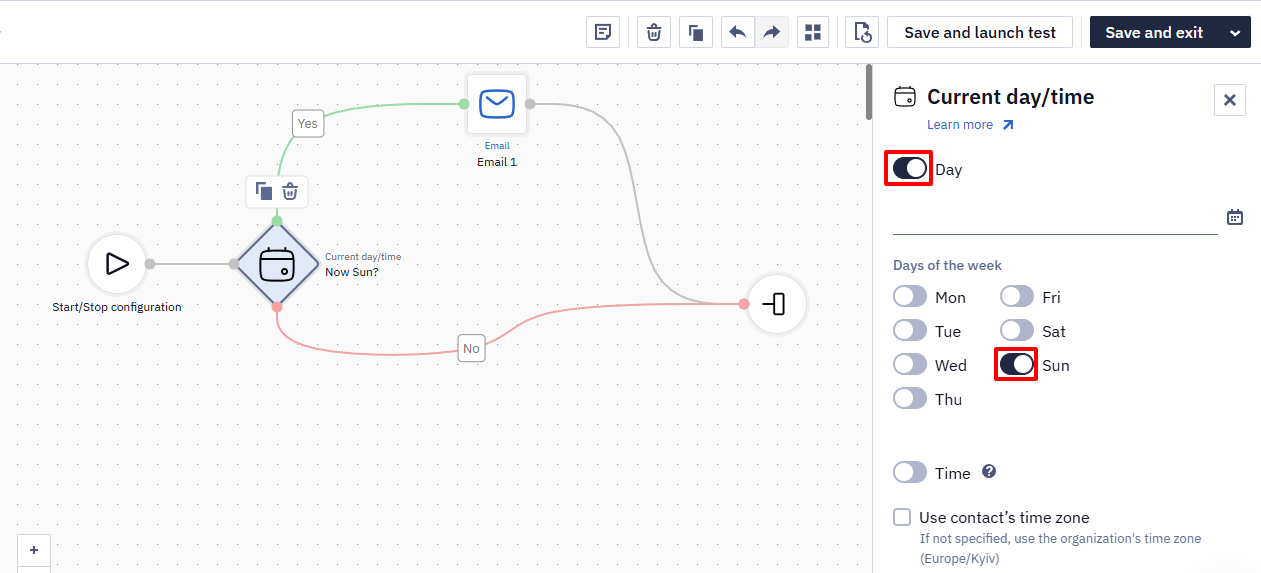
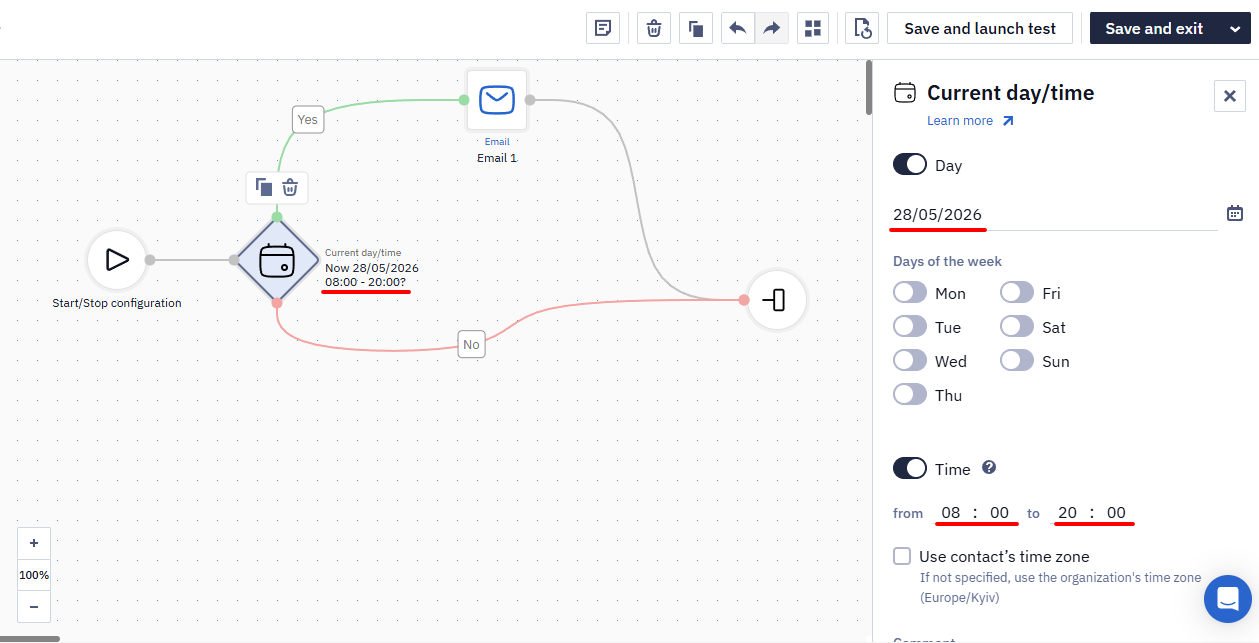
Setting a specific date excludes the option to choose a day of the week. You can specify the date or day of the week and time either together or separately. By default, the time check option is inactive.
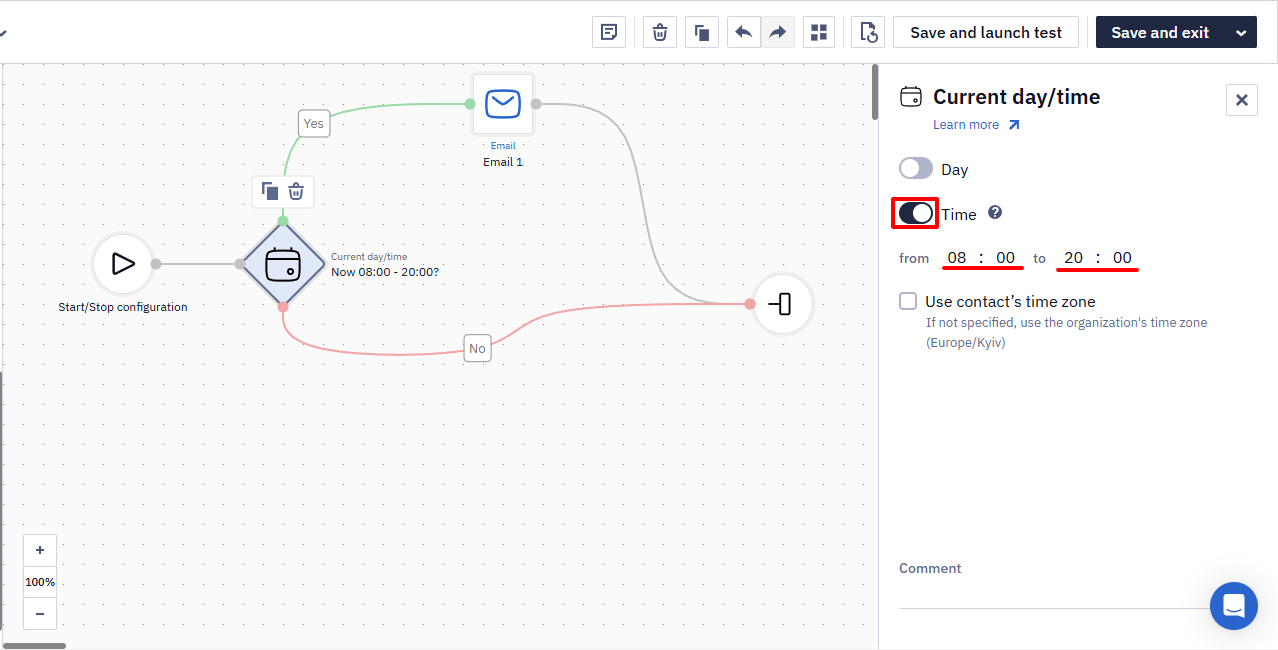
If you select a time without specifying a day, the specified time period will be checked every day.
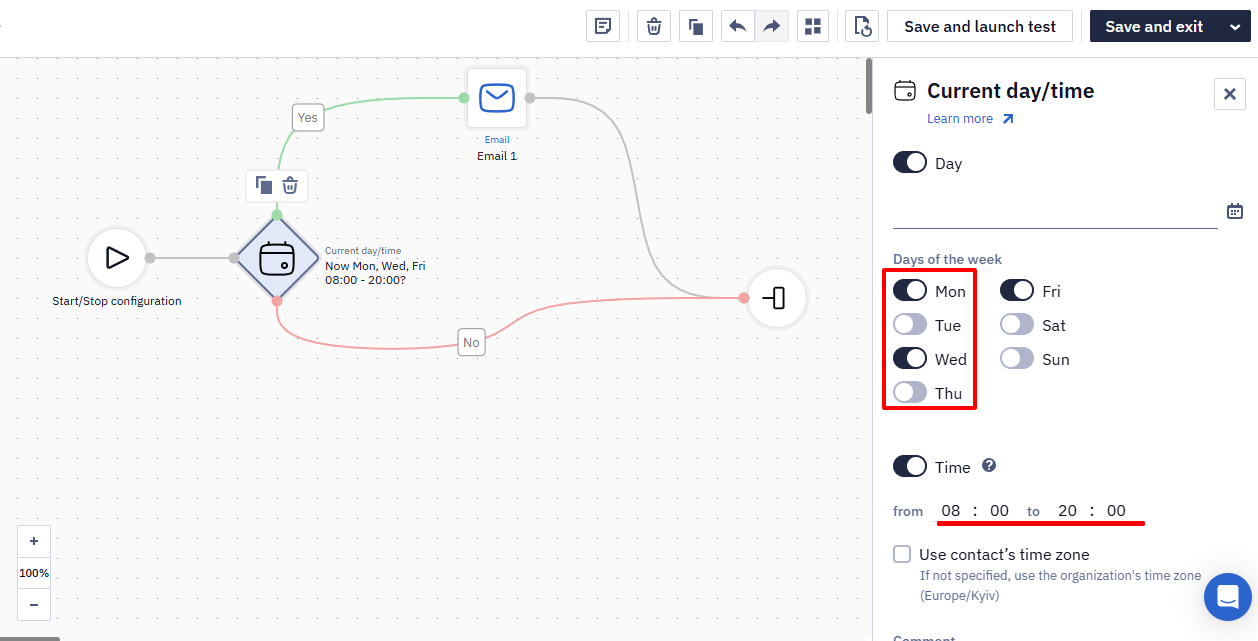
If you choose both a day and time, the time will be checked on the specified day.
The time is checked according to the user's local time, eliminating inaccuracies associated with daylight saving time changes.
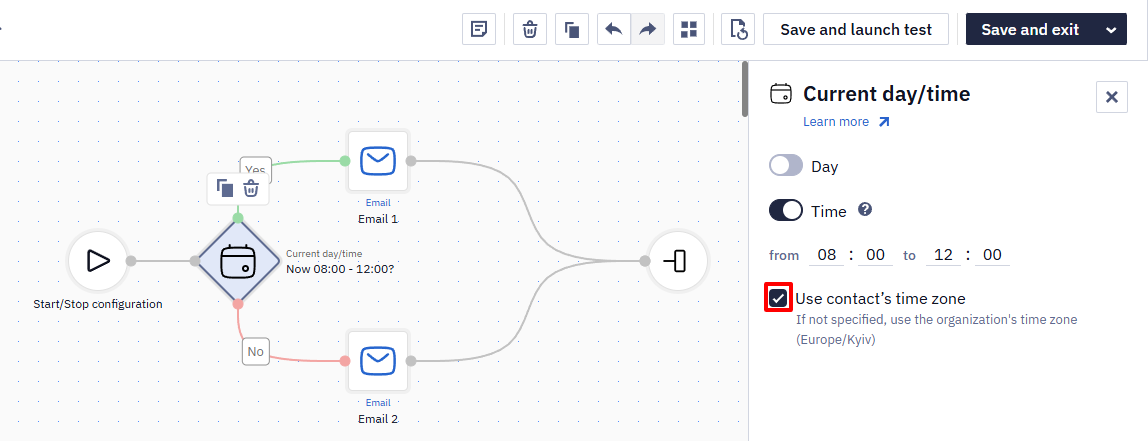
The specified boundary values are included in the check. For example, if you set the time from 08:00 to 12:00, and at the time of the check, it is 12:00, the script will follow the Yes branch.
Activating the Use contact's time zone parameter will allow you to send a message at a specific time, taking into account the contact's time zone.
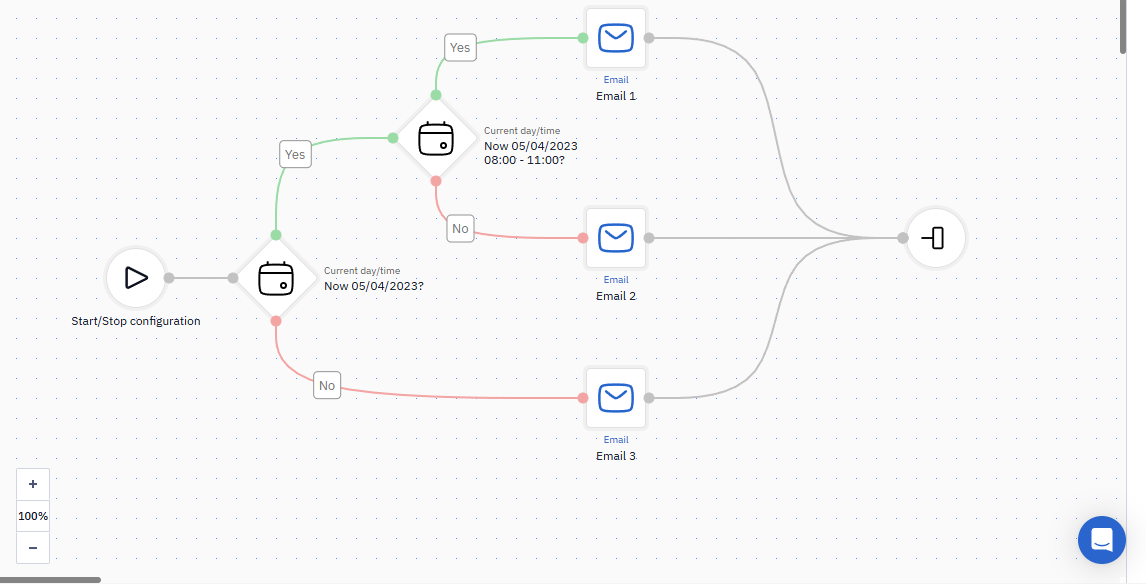
Let's look at how the block works. For example, on April 5, 2023, at 7:00 PM, there is a webinar that you can register for until the beginning of the broadcast. Depending on the date and time of the user's registration, you want different versions of email messages to be sent to them:
- Email 1: Before the day of the event – "We look forward to seeing you at the webinar on April 5 at 7:00 PM."
- Email 2: On the day of the event until 5:00 PM – "Already today! See you at 7:00 PM."
- Email 3: On the day of the event after 5:00 PM – "Starting very soon! Don't miss the beginning at 7:00 PM."
The workflow operates as follows:
- The workflow proceeds to the Current day/time block and checks today's date (Is it now 05/04/2023?);
- If the date does not match the one specified in the parameter, the workflow will follow the 'No' branch – sending Email 1;
- If today is 05/04/2023, the workflow will follow the 'Yes' branch and check the time of day;
- If it is not later than 17:00, it will send Email 2;
- If the current time does not match the specified time – it means it is later than 17:00, and in that case, it will send Email 3.
Also, using the same conditions, you can opt not to send your campaign:
- On specified days
- On specified time
- At certain times on certain days
- At a certain time and day
Variable Matches Regular Expression
The task is to check a certain variable from the event or the data received from other blocks.
For example, you can check if your recipient is a male or a female and send them different messages.
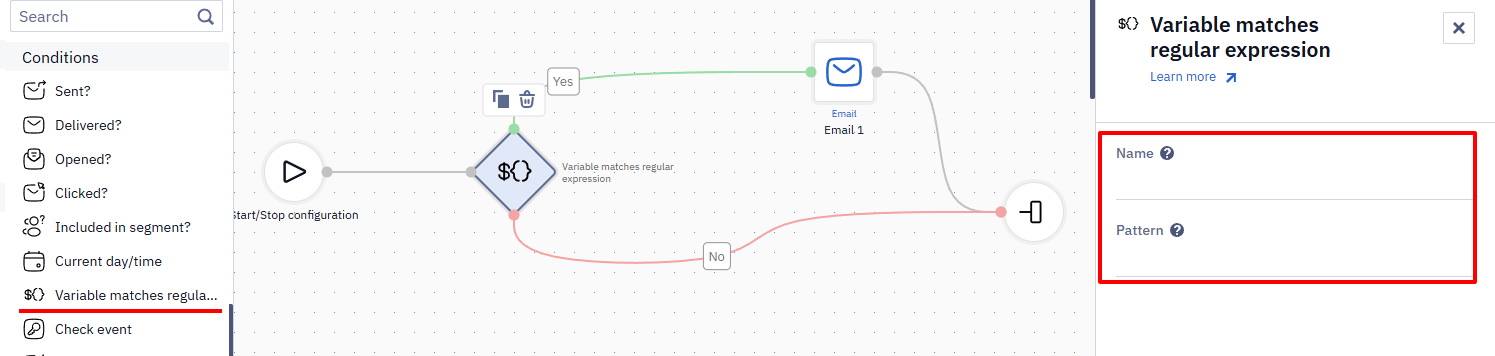
The task has 2 parameters:
- Name: variable name. It could be an event parameter. The parameter name is entered in this field without
${}. If you check the data obtained by other workflow blocks (for example, Get contact), specify the system variablesmartMessageJsonin the field. - Pattern: regular value checked for compliance. For example, to check whether the event parameter address contains the word "London", specify London in the Pattern parameter.
The block processes event parameter values as strings and has no numeric comparison operators (greater than/less than). To run a numeric check, describe the number range with a regular expression. For example, to route contacts whose parameter value is greater than 50, use the pattern:
^(50\.(0*[1-9]\d*)|5[1-9](\.\d+)?|[6-9]\d(\.\d+)?|\d{3,}(\.\d+)?)$This pattern matches any number greater than 50, including decimal values.
Check Event
The task is to check whether a particular event occurred since the workflow was launched. Events are searched by keys.
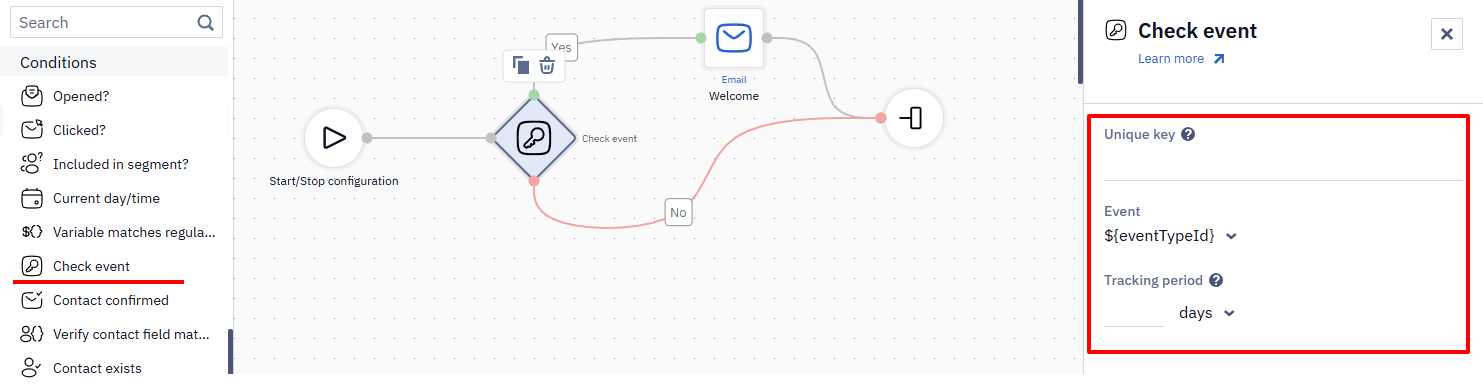
The task has 3 parameters:
- Unique key: event key. For example, it can be an email address; thus, this field should contain a parameter with an email address. This is a parameter from the event that launched the current workflow. If it's emailAddress, enter
${emailAddress}in the field. - Event: event type. This is a required field without which the workflow will not start.
- Period: you can set the time before the start of the workflow, during which the event must be checked. By default, the block checks for events since the activation of the workflow.
Set a period when the next steps depend on what the contact did before the workflow started. For example, at the start of the workflow, check whether the contact paid or registered in the day before the start: if not, send a promo code; if yes, send an informational email.
To send a reminder only when a specific event didn't occur within a time window (for example, a contact didn't complete a purchase within 24 hours of adding an item to cart), combine a Timer with Check event:
- Add a Timer block set to the window you want to wait, for example, 24 hours.
- Add a Check event block and set Event to the event you're waiting for, for example,
OrderCreated. Leave Period empty: by default, the block checks for events since the activation of the workflow. - Connect the reminder message to the No branch — this fires only for contacts where the event was not found within that window.
Contact Confirmed
The task is to check whether the contact's email has been confirmed.
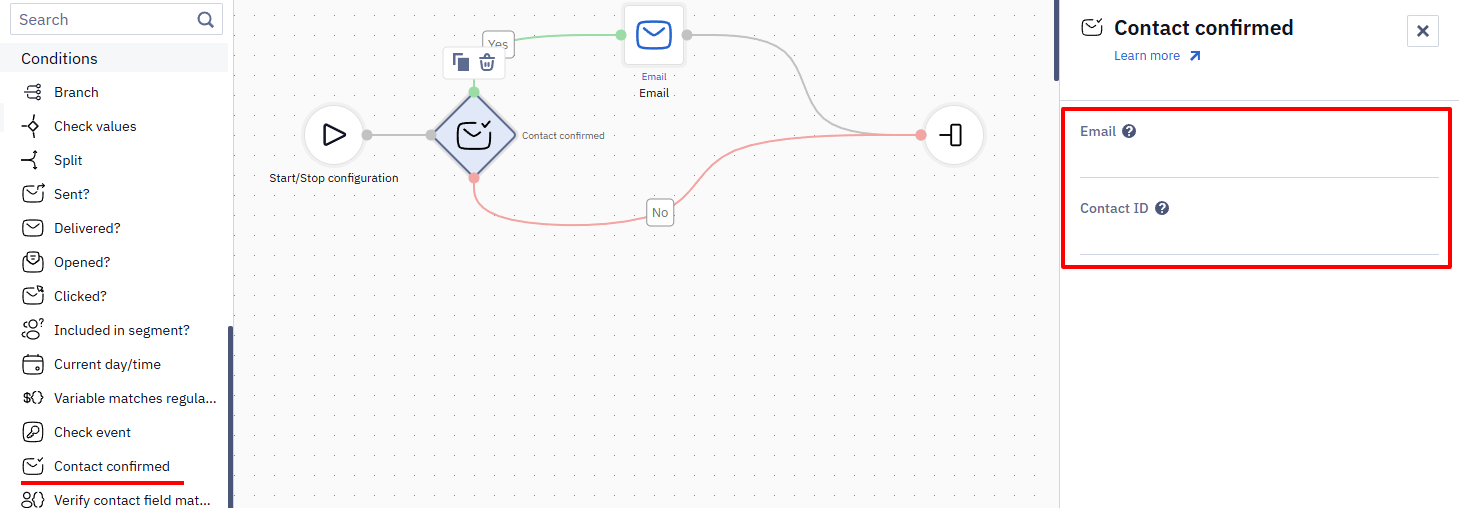
For example, a person has subscribed to your newsletter, and you want to send a welcome email.
The task works as follows:
- The contact is added to the eSputnik database but has an unconfirmed status.
- A confirmation email is sent to the contact.
- The task checks whether the subscription is confirmed.
- If it is confirmed, the Yes path is triggered, and a welcome email is sent.
- If it isn't confirmed, the No path is triggered.
The task has 2 parameters:
- Email: contact's email address;
- Contact ID: contact's ID in the system.
By default, the system checks whether the contact is confirmed by email. Specify the name of the variable or the email address in the Email field. For example, ${emailAddress} or [email protected]
If you want to use a contact ID for confirmation, specify ${contactId} in the Contact ID field.
One of the parameters must be specified.
Verify Contact Field Matches Event Parameter
The task allows checking if the contact field matches the passed value in the event parameter.
For example, you want to check if the subscriber's city matches the city value passed in the event. If that is not true, you can place the contact update block downstream.
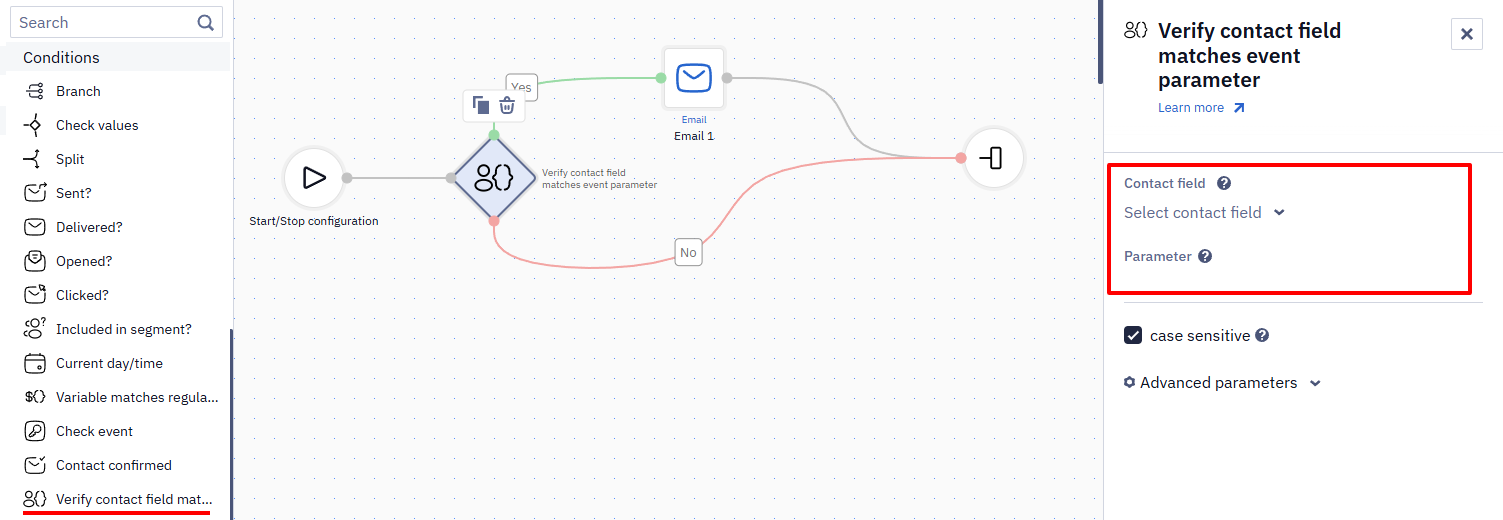
The task contains two basic parameters described in the table below.
| Parameter | Description |
|---|---|
| Contact field | The field from the contact information that has to be verified. Click the down arrow to select a field from the dropdown list or enter the field's name in the box. You can compare the following field types:
|
| Parameter | The event parameter. The task checks if the contact's field matches this parameter. You can enter the value as a variable in the format of ${parameterName} (the parameter's name in an event, for example, ${city}), and in this case the contact's field is compared with the value of the parameter in the event.Using the 123abc format is acceptable (for example, Kyiv), in this case the contact's field is compared with the specific value in the parameter (Contact's field 123abc?). Select case sensitive if this operation is case-sensitive. |
The task also contains advanced parameters.
More about advanced workflow block parameters >
Contact Exists
The task is to check whether the contact exists. It works similarly to Contact confirmed.
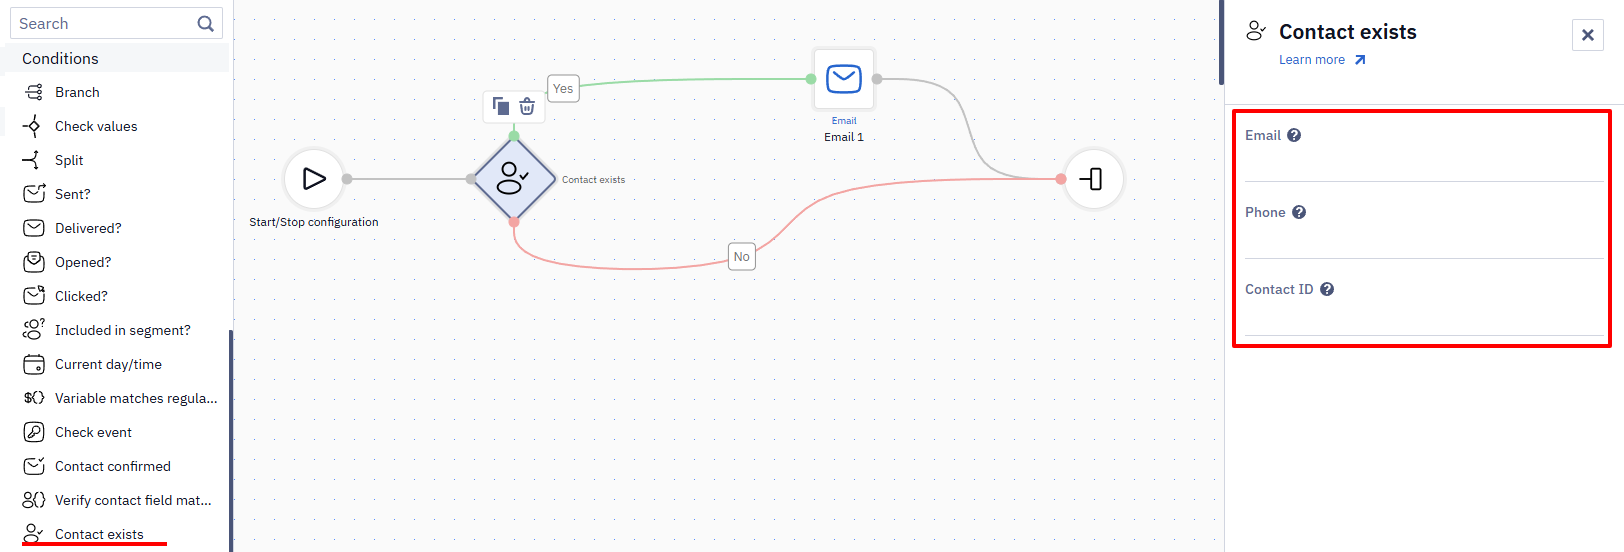
The task has 3 parameters:
- Email;
- Phone;
- Contact ID.
By default, the system uses an email address. If you want to use a contact ID, specify ${contactId} in the Contact ID field. To identify a contact by phone number, specify ${phoneNumber} in the Phone field.
Check the Checkbox List Fields
The purpose of the task is to check for empty or specific checkboxes in the contact card.
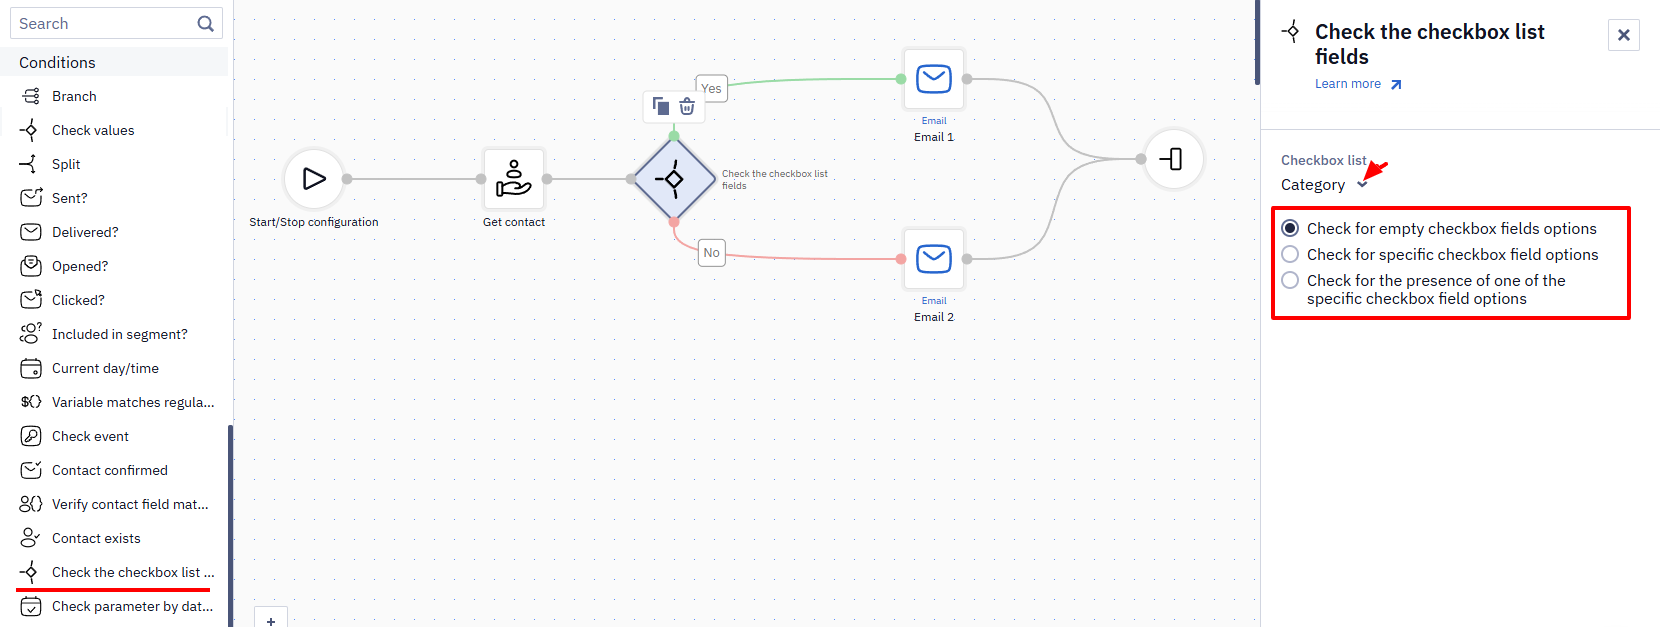
The list of checkboxes displays checkboxes created in the Additional fields section.
The following checking options are available:
- Check for empty checkbox fields options
- Check for specific checkbox field options
- Check for the presence of one of the specific checkbox field options
Check Parameter by Date/Time Value
The purpose of the task is to check the date from the event parameter.
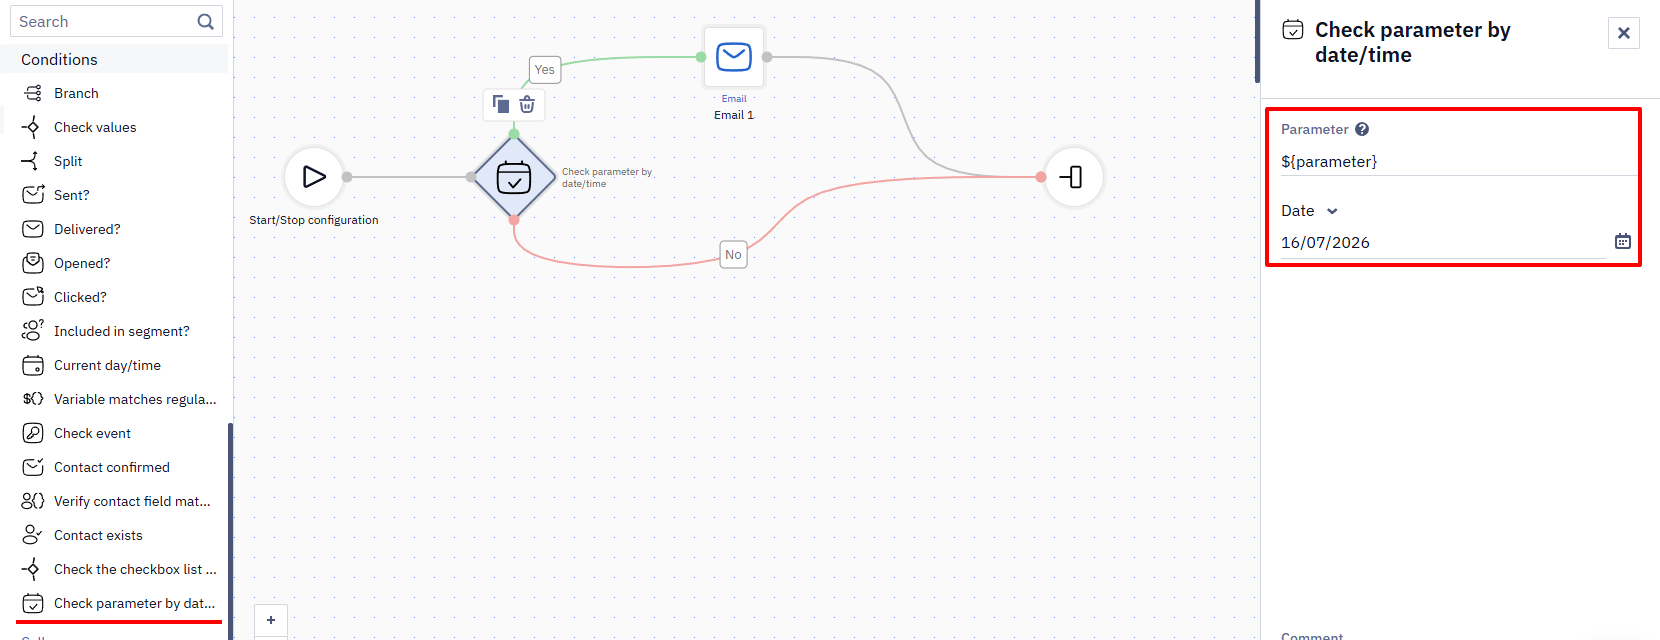
When creating a workflow, the user's time zone is taken into account. Time will be saved in UTC.
For example, The date and time being checked is 2020-07-30 13.00. The user's time zone is GMT +3 (Europe/Kyiv). The following value will be passed to the event: "2020-07-30T13:00 + 03:00".
The task contains 2 parameters:
- Parameter. It is required to state the parameter's value passed in the parameter. By default, this is a variable
${parameter}. The date is in ISO 8601 format. - Date. Select an option from the list for a single date, time or the date/time range.
Parameter
The Parameter field accepts the parameter name in the system.
Enter the parameter name as a variable or a string. The format example: $USERID or 123abc.
Selecting the Date and/or Time Settings
To select the date and/or time settings:
- Click the down arrow and select one of the options from the list:
- Date
- Date with time
- Date range
- Time range
- Date/time range
- Date before
- Date after
- Date and time is greater that current by
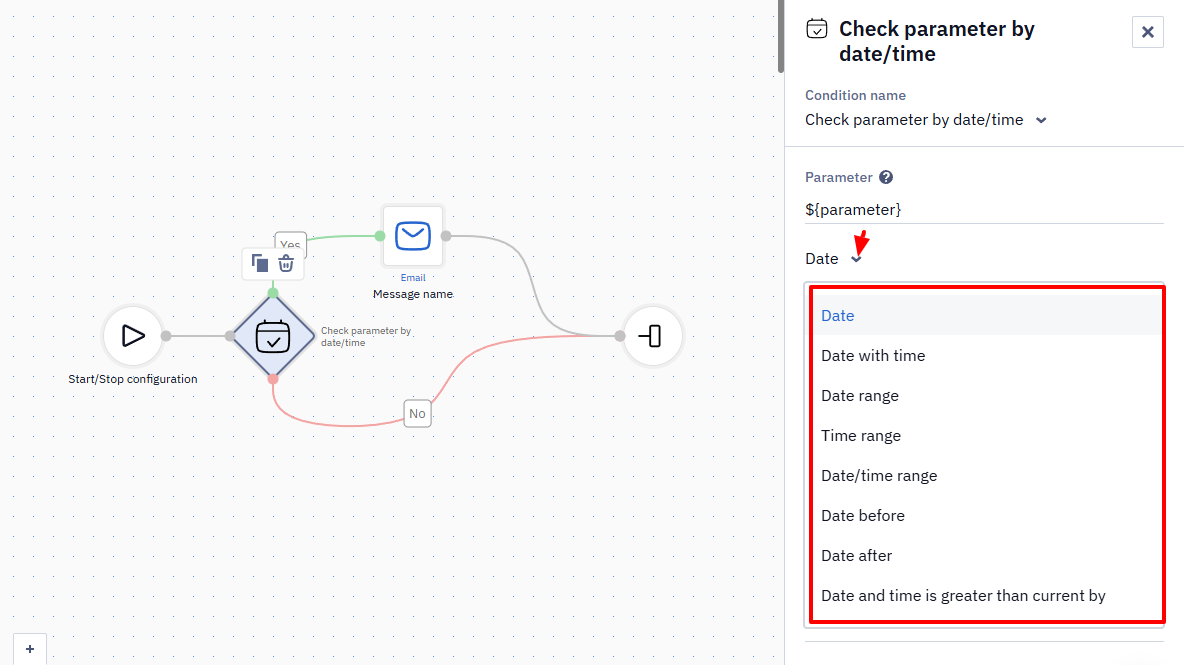
- Configure the required date and time settings for the selected parameter as explained below.
Configuring the Date Settings
When you select the Date parameter, the block checks if the event date matches the selected date for this parameter.
To select the Date settings:
- Click the calendar icon and select the required date.
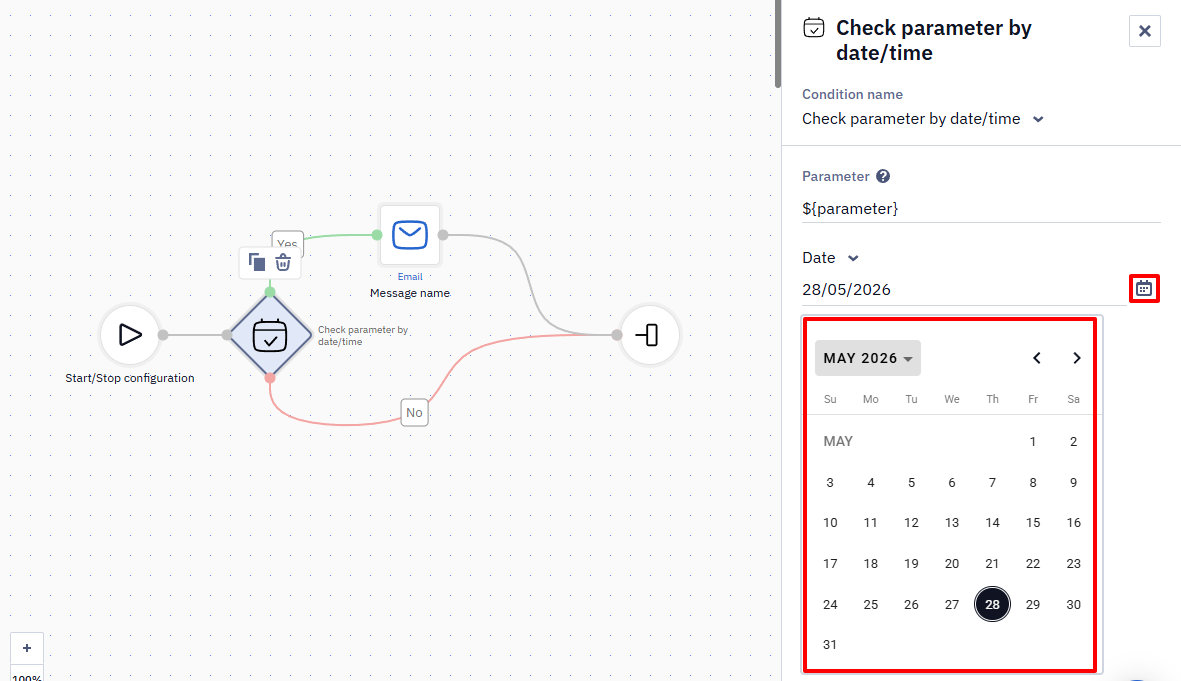
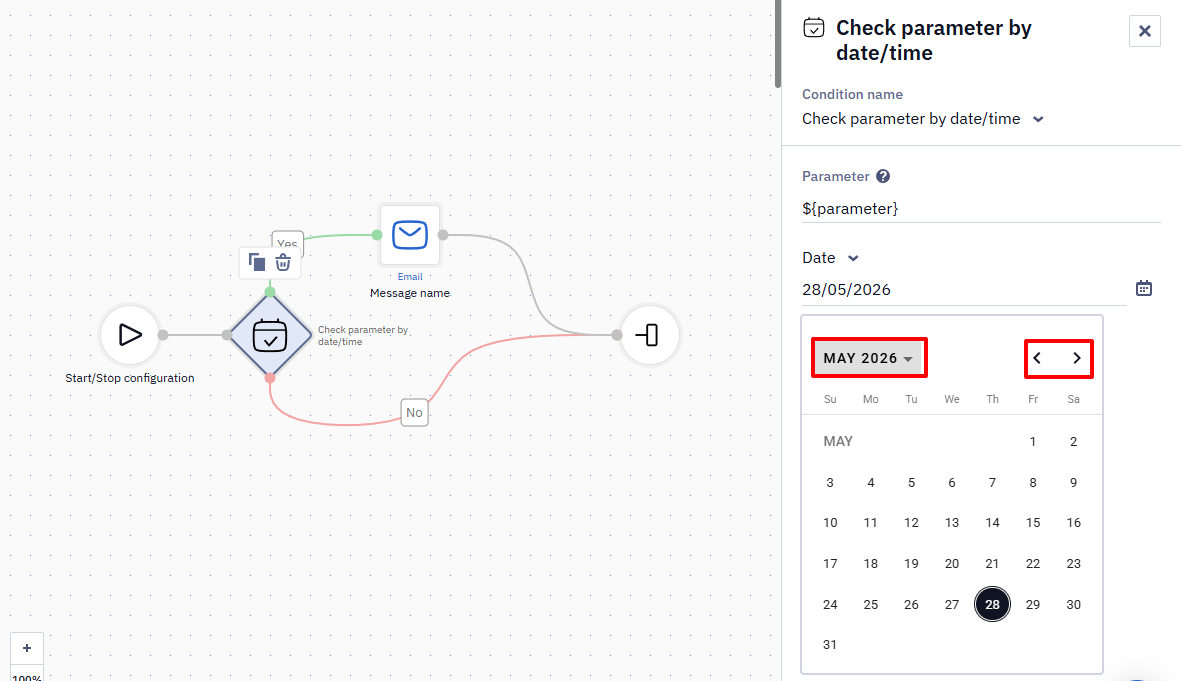
Click the left or right-pointing arrows to change the month, or click the section of the calendar to switch to the month or year selection.
Configuring the Date with Time Settings
When you select the Date with the time parameter, the block checks if the event date matches the selected date and time for this parameter.
To select the Date with time settings:
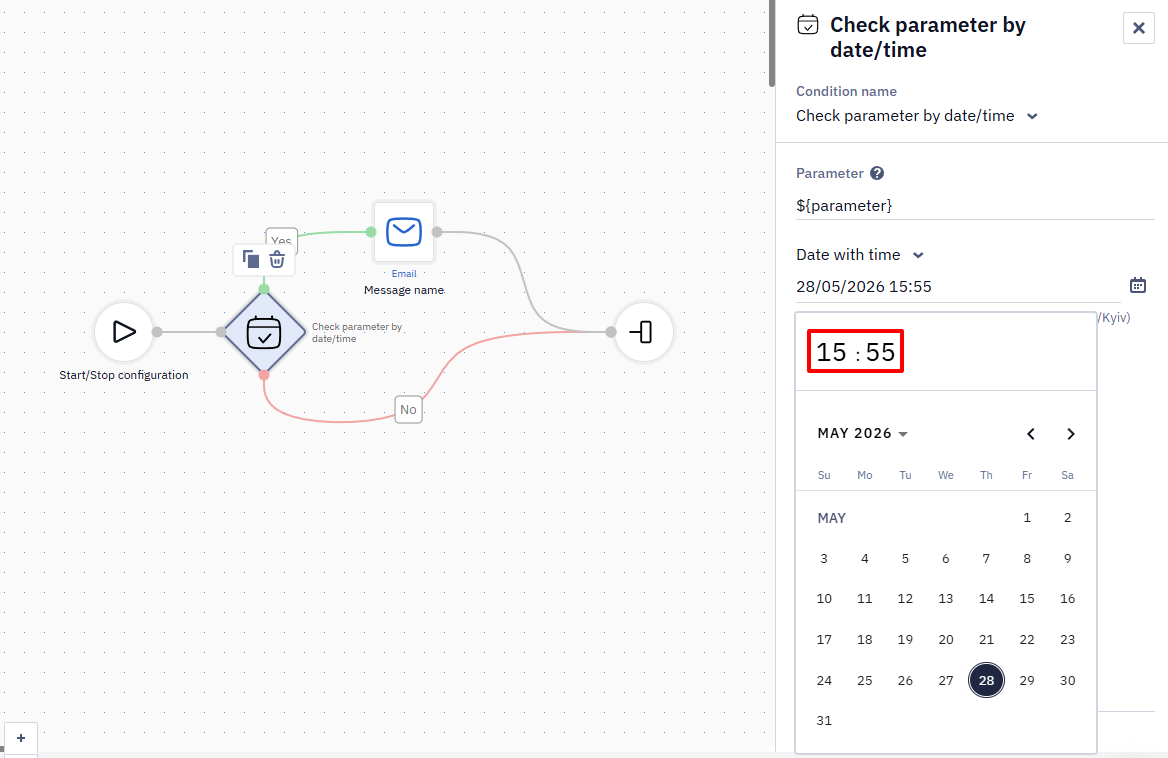
- Click the calendar icon and select the required date in the date selection window.
- In the hour selection window, select the required hour.
Configuring the Date Range Settings
When you select the Date range parameter, the block checks if the event date matches the selected date range for this parameter.
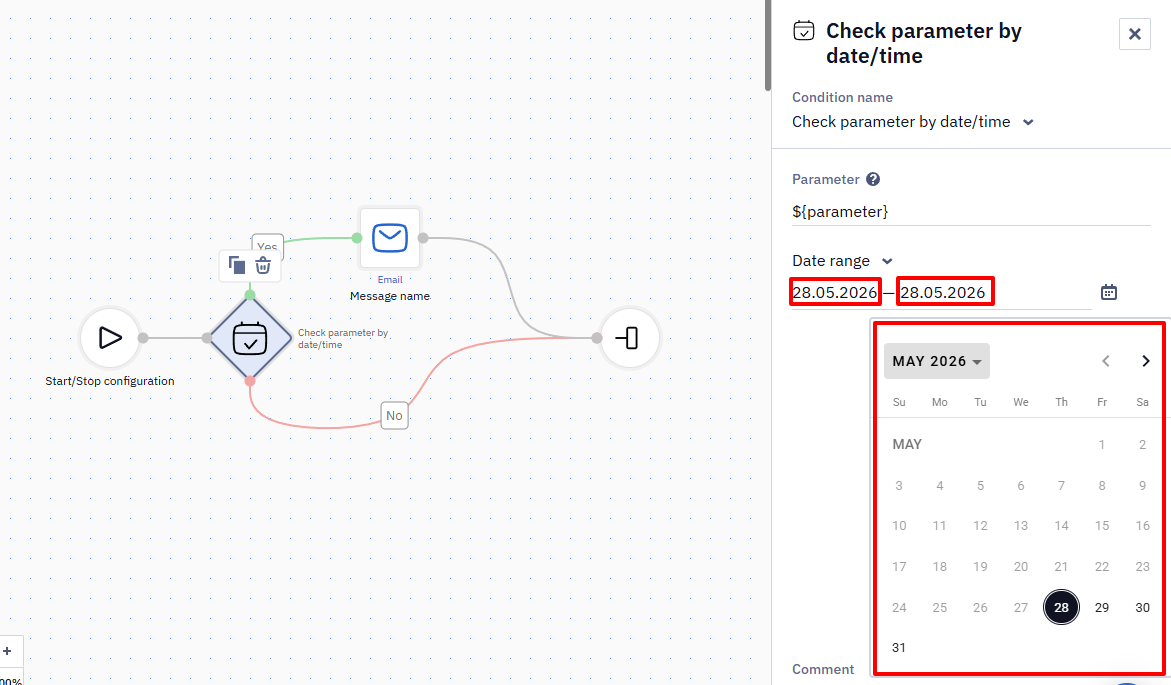
To select the Date range settings:
- Click the date beside the left field and select the initial date of the range.
- Click the date beside the right field and select the final date of the range.
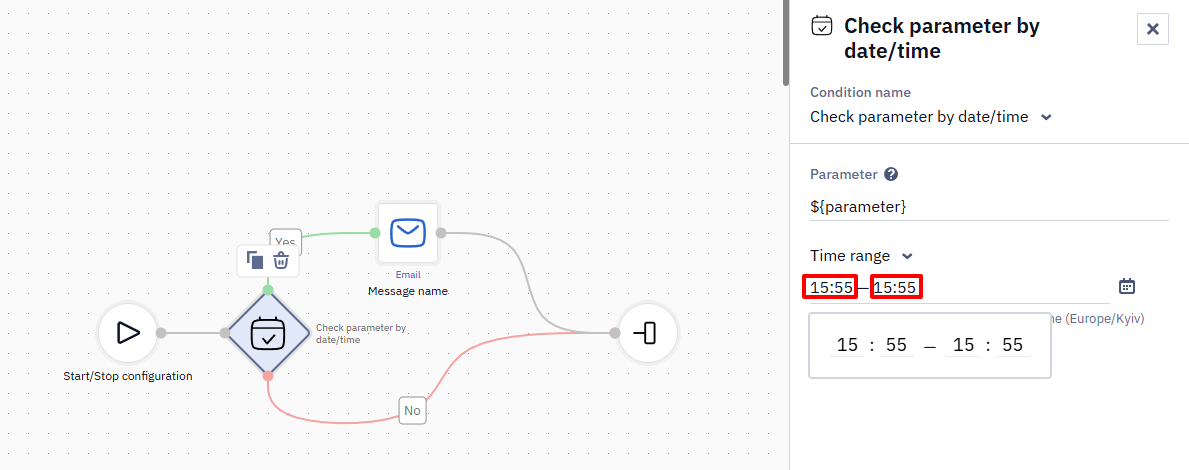
Configuring the Time Range Settings
When you select the Time range parameter, the block checks if the event time range matches the selected time range for this parameter.
To select the Time range settings:
- Click the time beside the left field and select the initial time from the time selection window.
- Click the time beside the right time field and select the end time from the time selection window.
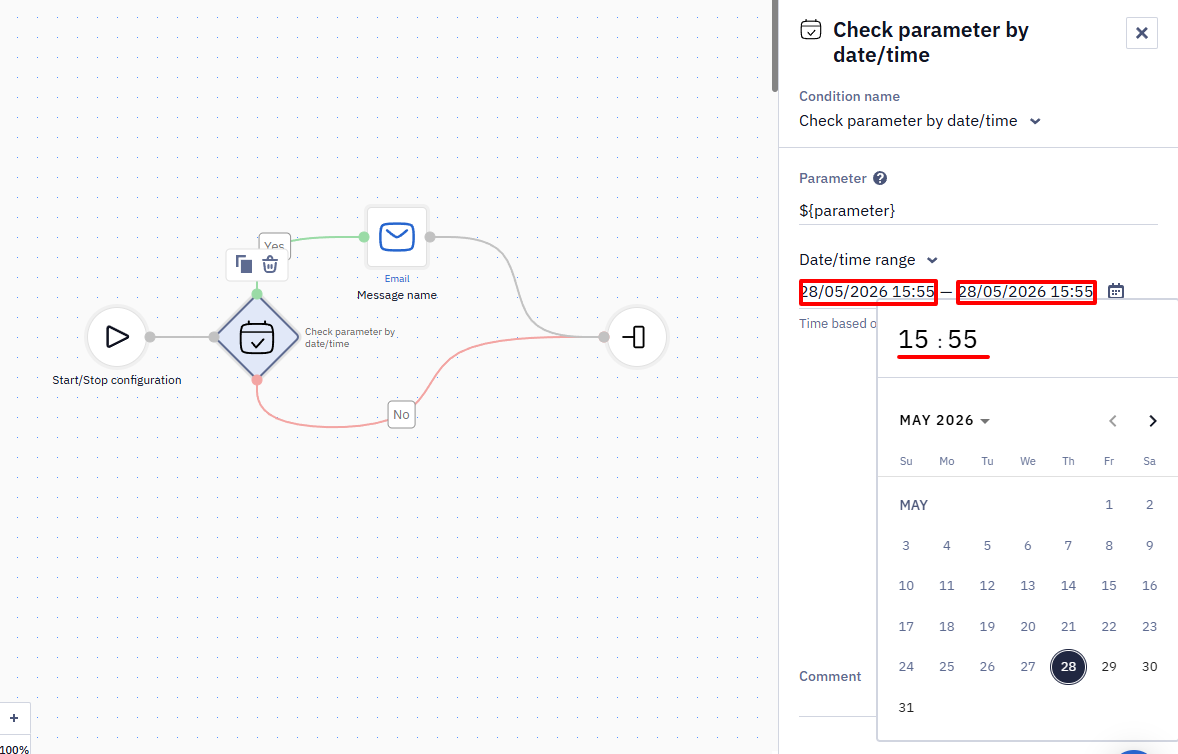
Configuring the Date/Time Range Settings
When you select the Date/time range parameter, the block checks if the event date and time range match the selected date and time range for this parameter.
To select the Date/time range settings:
- Click the left date and select the required initial date in the date selection window.
- In the hour selection window, select the required hour.
- In the minute selection window, select the precise time. The time values in this window are within the range of 1 hour with an increment of 5 minutes.
- Click the right date and select the final date, hour and minutes, the same as for the initial ones.
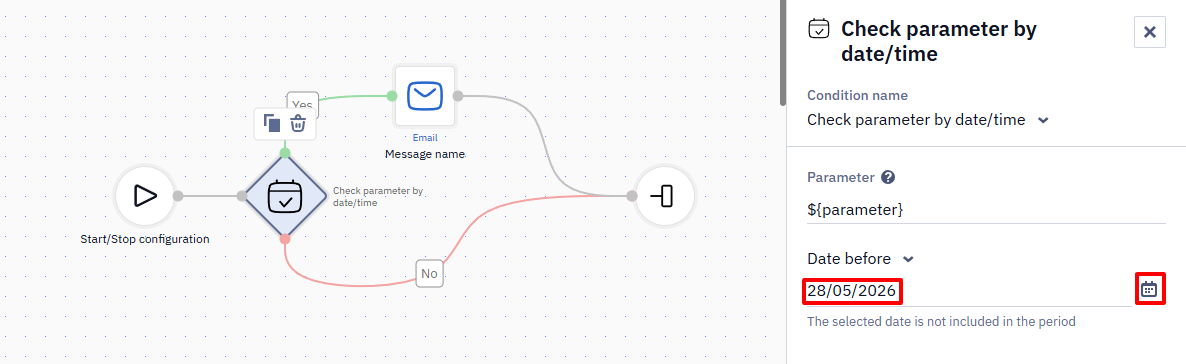
Configuring the Date Before Settings
When you select the Date before parameter, the block checks if the event date received as a parameter is within the date range before the selected date.
To select the Date before settings:
- Click the calendar icon beside the date field and select a date.
Configuring the Date After Settings
When you select the Date after the parameter, the block checks if the event date received as a parameter is within the date range after the selected date.
To select the Date after settings:
- Click the calendar icon beside the date field and select a date.
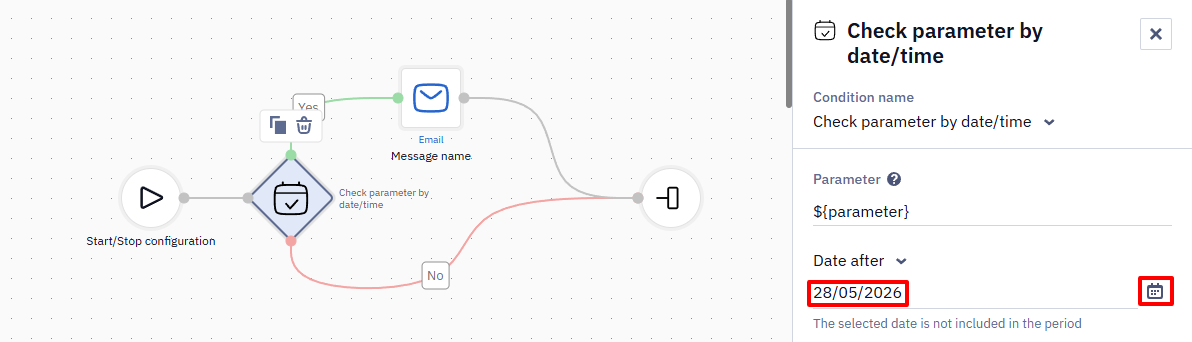
The selected date for the Date before and Date after parameters is not included in the period.
Configuring the Date and Time Is Greater Than Current By Settings
When you select the Date and time is greater than current by option, the block checks if the event date and time received as a parameter are greater than the current date and time by N minutes/hours/days.
Example:
The date and time of your webinar is 2022-10-10, 16:00.
You have configured to send 3 messages to the registered persons: 30, 10 and 5 minutes before the webinar start.
The person's registration date and time is 2022-10-10, 15:52 (the current date and time).
The block compares the current time and the time from the event parameter. As the result of the comparison:
- Sending the first message is cancelled because the condition for sending the message (30 minutes before the event) is false.
- Sending the second message is cancelled because the condition for sending the message (10 minutes before the event) is false.
- The third message will be sent as scheduled because the condition for sending the message (5 minutes before the event) is true.
To configure the Date and time is greater than current by option:
- Enter the required value in the field and select its format from the dropdown list: minutes, hours or days.
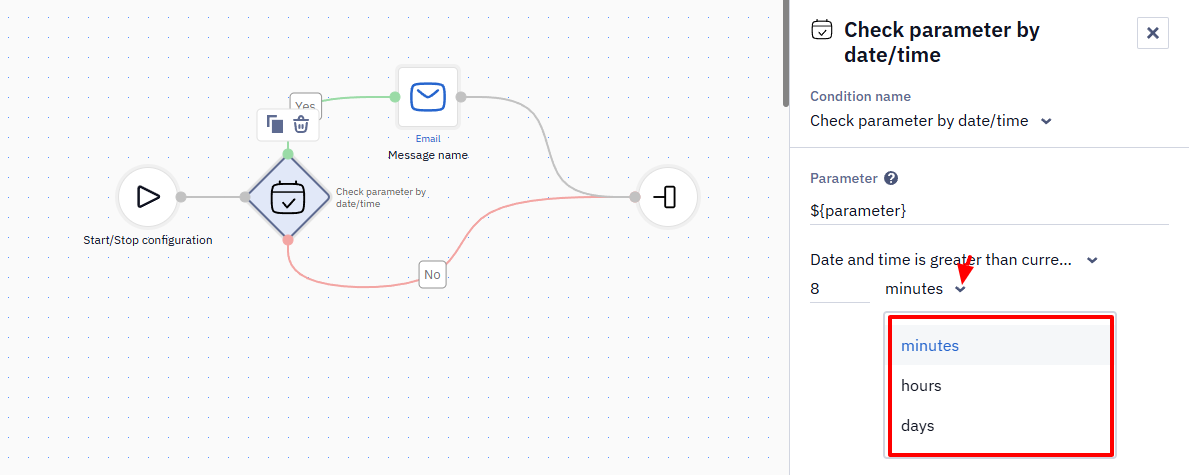
The condition counts forward from the current moment: it's met when the date in the parameter is later than the current date and time by the specified value. To check whether something happened within the last N minutes, hours, or days, use the Check event block with the Period setting instead.
Updated 24 days ago