
Order Transfer Using the Generate event API Method
Order data is transmitted to our system via the resource Add orders that has a number of limitations:
- Fixed fields that are determined by the specification;
- Impossible to add custom fields;
- Order parameters cannot be used to build segments.
You can overcome them with the resource Generate event that can be used to replace or complement Add orders API method. By using it, you’ll be able to:
- Transmit more data with additional fields;
- Use segmentation by events and their parameters, for example, sort out contacts who bought a particular item within a week;
- Expand/receive RFM segmentation by order without additional usage of Add orders.
To save orders in the system, you need to set up segmentation by events as the event contains a contact identifier. It can be determined based on the default or conditional parameters.
How to Send Orders
The order is not saved unless the event includes identification parameters.
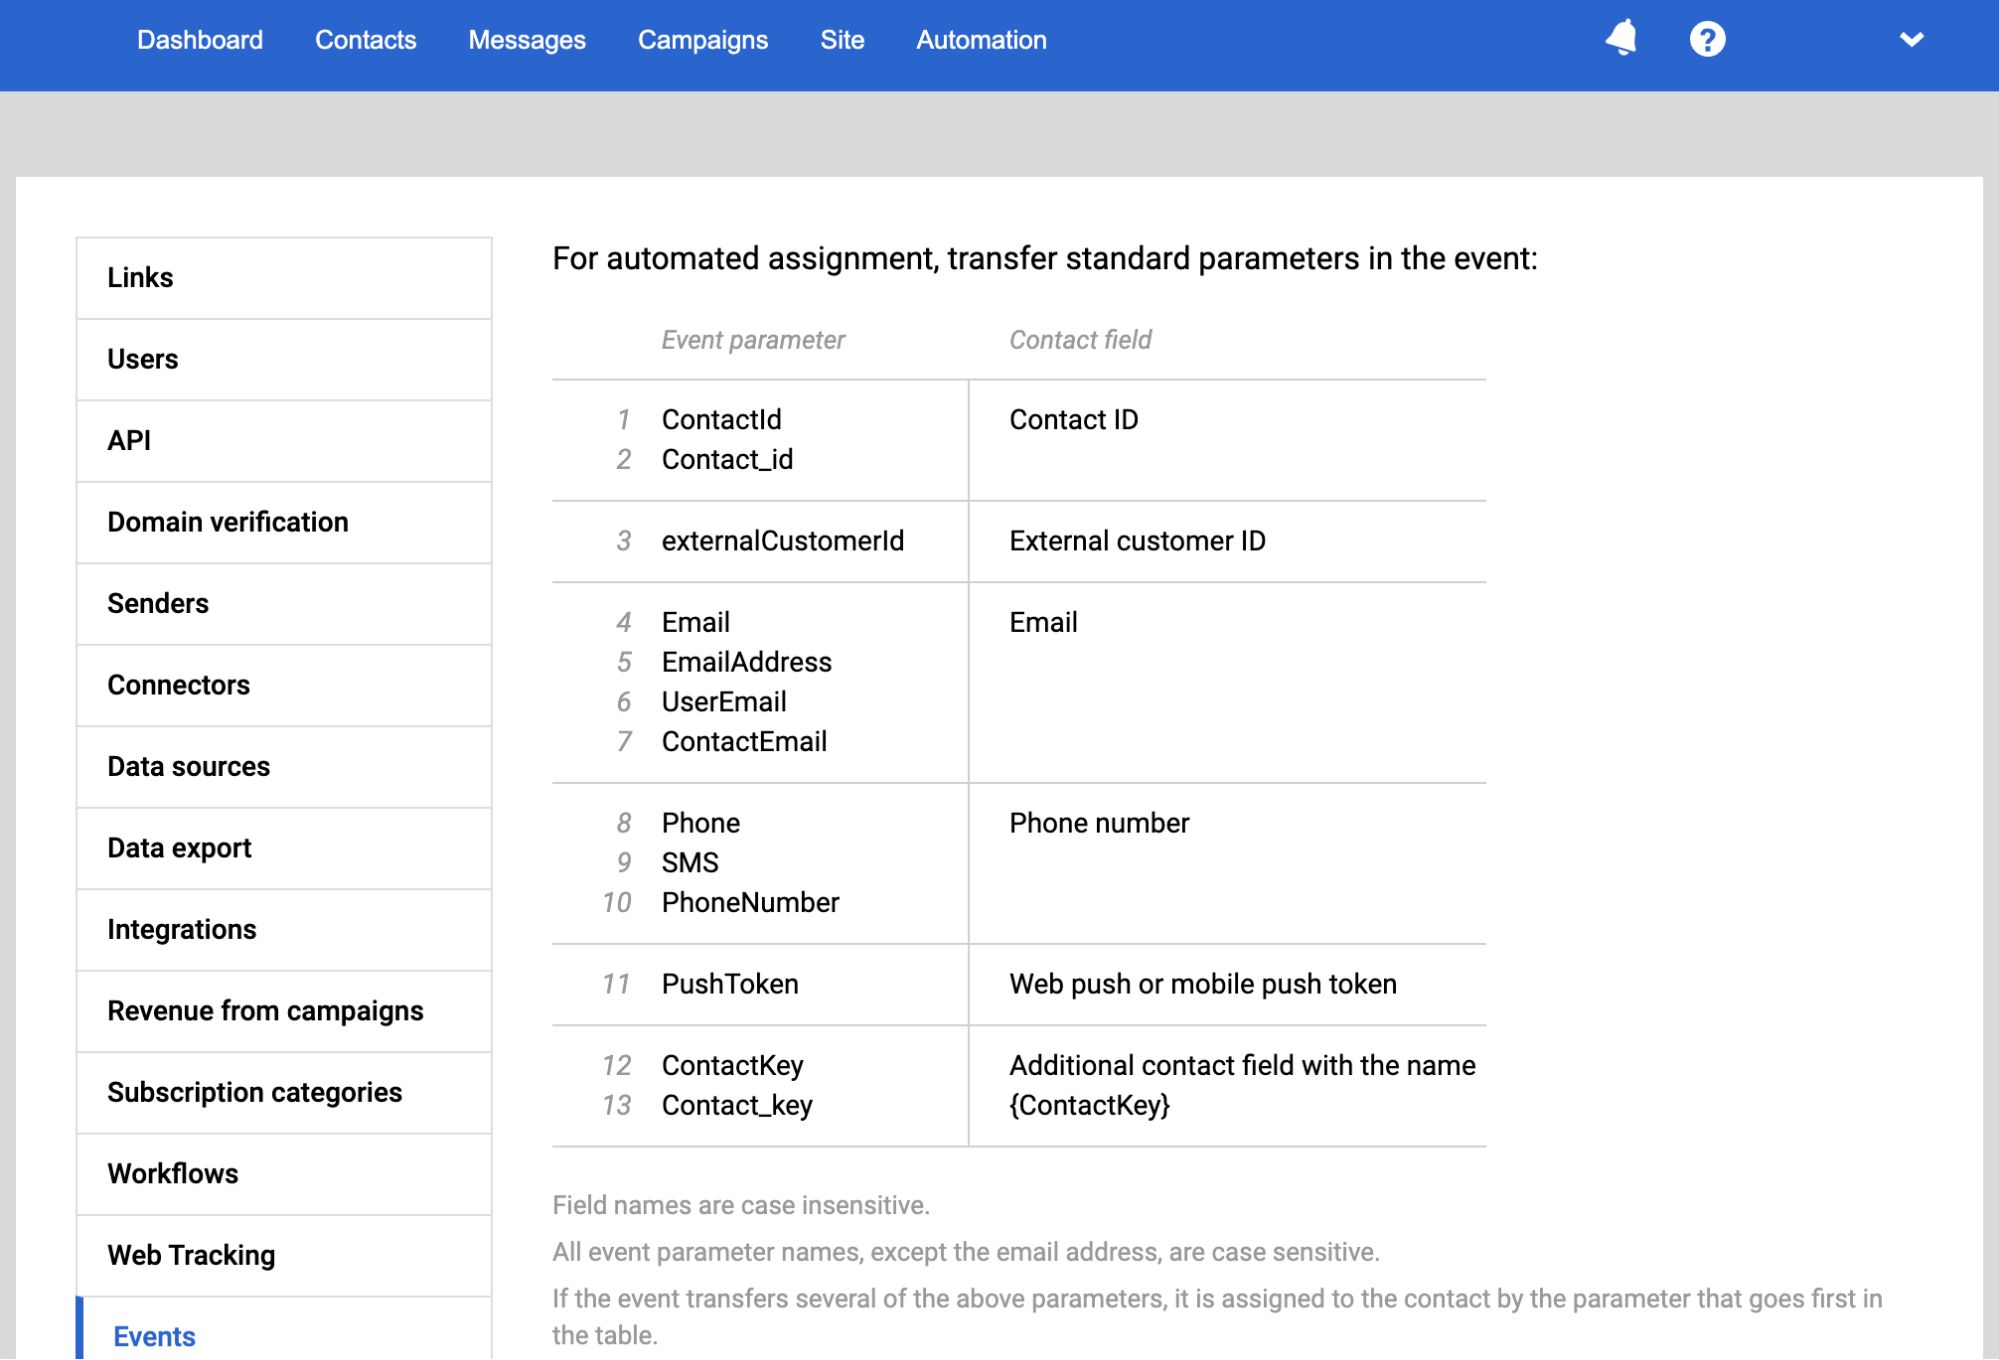
The system matches an event to a contact using the configured identification parameters. If no custom parameters are configured, the standard parameter names are used: contactId, externalCustomerId, email, and phone.
To send an order for a contact who is not yet in the database, use externalCustomerId.
| Identifier in the event | Contact in the database | Result |
|---|---|---|
externalCustomerId | No | The contact is created, and the order is linked to it |
contactId, externalCustomerId, email, or phone | Yes | The order is linked to the existing contact |
| Email or phone only | No | Neither the contact nor the order is created |
If the contact is not yet in the database and you only have their email address or phone number, add the contact first, then send the order.
Creating a Contact During an Email SendThere is an exception for events containing the email address of a contact who is not yet in the database. If such an event starts a workflow with an Email send, the contact is created during the send, and the order is linked to it.
In the sending block, set the Email field to the event parameter containing the address, for example
If both fields are empty, the workflow starts, but no email is sent and no contact is created.
Events are processed asynchronously, so the order and, if applicable, the new contact may not appear in the system immediately.
To send an order, specify the event type. Choose the type from the table below based on the order status.
| Event type | Description |
|---|---|
| orderCreated | Creates the order with the status indicated in the array |
| orderUpdated | Updates the order |
| orderDelivered | Changes the order status to DELIVERED |
| orderCancelled | Changes the order status to CANCELLED |
orderCreated
To create an order, name the parameters as indicated here and fill in the required parameters. If any of the required parameters isn’t filled, the event is ignored and the order will not be sent.
${eventKey}— the order's uniqueness key, passed inexternalOrderId. Used as the order identifier;${orderId}— the order ID in the system; the workflow needs this parameter to run.
The contact ID must be one of the following:
${externalCustomerId}- external contact ID;${email}- contact’s email address;${phone}- contact’s phone number.
To substitute parameter values in messages, send the fields with event parameters as an array.
- Required parameters for the order array:
externalOrderId,totalCost,status,date,currency,externalCustomerId/email/phone. - Required parameters for the items array:
externalItemId,name,quantity,cost,url,imageUrl.
Note
currencyis required even though it isn't always enforced in older integrations — a request without it is rejected withcurrency must be specified.
NoteThe total cost of the items in the order must match the
totalCostvalue (the total order amount). If an item is sold at a discount, pass the discounted price initems.cost.
NoteOnce the order is linked to a contact, it appears in the Orders section.
Example:
{
    "eventTypeKey": "orderCreated",
    "keyValue": "380501234567",
    "params": [
        {
            "name": "phone",
            "value": "380501234567"
        },{
            "name": "externalOrderId",
            "value": "12345679"
        }, {
            "name": "externalCustomerId",
            "value": "AV13760"
        }, {
            "name": "totalCost",
            "value": "258.0"
        }, {
            "name": "currency",
            "value": "USD"
        }, {
            "name": "status",
            "value": "INITIALIZED"
    }, {
        "name": "date",
        "value": "2020-05-14T10:11:00"
    }, {
        "name": "items",
        "value": [{
            "externalItemId": "200600",
            "name": "Super Device",
            "category": "devices",
            "quantity": 1,
            "cost": 990,
            "url": "http://example.com/item/200600",
            "imageUrl": "http://example.com/item/200600/image.png",
            "description": "High quality"
        }]
    }]
}
ImportantTo save the event assigned to the contact, you need to know what event parameter contains the identifier. By default, the system searches for the following parameters excluding the register:
ContactId,Contact_id,EmailAddress,UserEmail,ContactEmail,Phone,SMS,PhoneNumber,PushToken,ContactKey,Contact_key. All values, except for the email address, are mapped including the register.
Line items come from the items parameter. A products parameter is stored with the event as an extra parameter, and the order is created with an empty item list.
orderUpdated
Updates the order that has the parameter externalOrderId filled.
If the transmitted order doesn’t exist in the system, it’s created anyway.
The parameters must be named as indicated in BODY PARAMS. If the order is to be created, the orderCreated requirements apply.
If you switch to passing orders with an event, update the historical orders first and turn the workflows on only afterwards — otherwise messages go out for the orders you update.
orderDelivered
Changes the order status to DELIVERED.
If the order does not exist, it is ignored.
NoteOnly orders with the DELIVERED status are used to build the RFM table and calculate revenue from campaigns on the Report tab. Orders from web tracking are counted in the revenue visualization with any status.
Exceptions are orders received from the mobile SDK, in which case the statuses INITIALIZED and DELIVERED are taken into account by default in the revenue visualization. If necessary, the INITIALIZED statuses can be disabled — for this, contact our support service [email protected]
orderCancelled
Changes the order status to CANCELLED.
Why an order ID can equal a contact ID
If an order arrives without externalCustomerId and without another customer identifier, the system may resolve the customer from tracking data and use the internal contact ID as the order's customer identifier. This is expected fallback behavior. To keep your own identifier in order data, always send externalCustomerId explicitly.
Updated 10 days ago